Showing posts with label #bhprojectlife. Show all posts

Sunday, July 16, 2017

Photobook tips and tricks

Earlier this week, I posted on Amber LaBau's blog about some tips and tricks for printing photobooks. One of the things that I miss when I made the switch to digital scrapbooking in 2014 was the ability to have pages done "in real time"... or at least in chunks like I had been doing with my Project Life albums in 2012 and 2013.  My family loved to look at these books and flip through all the photos and relive the memories that they represented.  I was able to keep up pretty well during those 2 years and I loved it.  Part of the reasons I moved to digital was the ability to scrap traveling or commuting so that I could scrap current memories.  Plus with photos in digital format it was 1 less step to take to take in my process.  So let me talk about my evolution of getting my digital creations from my computer to a physical version that my family and friends can enjoy.


Here is my 2nd half of 2014 12x12 album (p.s. - this is a Becky Higgins Project Life album and is still available at Michael's  - make sure to use a coupon!) I was able to fit Jan-August in the first album and this album holds Sept- December including our 13 day trip to Spain...


Now I don't often have such a fabulous trip to add to my yearly album ( I wish... right??) but I couldn't jam the whole year into 1 album so this was my compromise.  I can still print these into a separate photo book later on if I want - but more on that later.


A 2 page spread from our trip to Spain using The Lilypad's Memory Pockets Monthly products
In 2015, I decided to move to printed 10 x 10 photobooks in lieu of printed 12x12 individual pages slipped into page protectors.  I saw how hard it was for my older relatives to look at those big and heavy books - plus I still had so many scrapbooks I wanted to complete (both older and future stories) that I could not imagine where I could store all those albums - you see I already have about 40 12x12 albums in IKEA Billy shelves (similar to the current Kallax - they don't make this size of the Billy anymore :-( ... and I easily have 20+ albums I wanted to create of older stories, heritage, vacations etc that I had rolling around in my head plus 2 albums per year for Project Life adds up quick!


Using Amber LaBau's Project Life 2016 Edition for my cover


See how thin this 50+ page 10x10 book is!
I save all my pages to my normal storage places first, see this post on Amber's blog regarding the importance of backup.   Next step in my process is to upload to my preferred photo book provider.  I have used Shutterfly to date on all my books and I have been fairly happy with the results.  I know there are other options out there - including printing from the Becky Higgins Project Life app, Adoramapix, Mixbook and Picaboo. They have all have different page limits, costs and quality issues that you need to account for.  But there are some tips I have learned along the way printing my photobooks/scrapbooks that I will share to make your process that much smoother. Plus I have come up with a few ways to incorporate some fun "paper" elements into my printed photobooks as well.


Using Amber's Project 2016 Project Life Collection
I have used actions in the past to help create consistent borders to avoid bleed issues when printing out my books. Studio Wendy has some great actions to create bleed for 10 x 10 books specifically for Shutterfly.  She has some great options for other sizes and printers as well.  But what if you don't want to use an action - what are your options?


Page on right doesn't use an bleed action - and the borders are inconsistent. I am ok with this sometimes, but other times not.


A page with a "solid" background can often hide the bleed issues more easily


Trying the lay flat option on my most recent photo books - almost identical height and depth only slightly wider


Binder is just a bit wider to include this extra portion to make it lay flat
Below is the comparison of the lay flat versus non lay flat.  Lay flat does help with the bleed of the center, but does not necessarily adjust for borders on top, bottom or sides.  There are several printers that offer lay flat options - but generally they are more expensive than standard binding  - sometimes much more expensive.  This expense might not be worth it for you - or may only be worth it for special event books - printing can be a very personal decision based on your budget and goals/objectives.
One tip I have for everyone regardless of your preferred printer is to assemble the book as you go - that is, don't wait until you have every page done until you start uploading into their book making tool.  Most places have special sales which can lower the cost of your photobook.  In some cases you can save 40%-60% during a sale  - but you often don't have a lot of warning.  If you are close to finishing a project it might be worth putting in a big push to take advantage of a sale - but it's a lot easier when the book is almost assembled
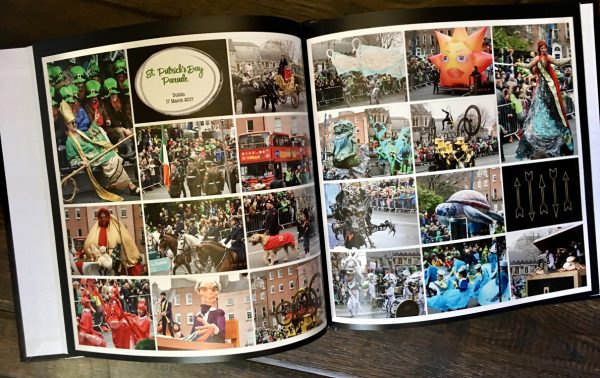


Non lay flat
The way I am currently dealing with bleed issues is to adjust all the pages after they are placed in my "draft" Shutterfly book.  If you go into "Advanced Editing" you can adjust 1 page to 95% or 90% and have this adjustment applied to EVERY page in your album.  I don't mind the black border around every page and it resolves the bleed issue on every page. Other photobook printers have similar tools which can be used to help create a consistent border.  Now this book above and below is a special book I did for my son's Marching Band trip to Ireland.  My hubby and I went as well - but did some different activities along with some of the same.  I created 2 photobooks - with about 1/3 of the pages the same and 2/3 different.
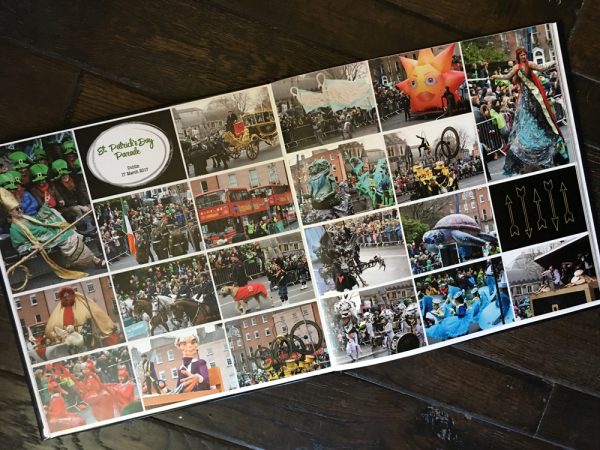


Lay flat option - excellent at the center but can still cut off top, bottom or sides.
Finally, I have used both washi tape and some label holders to help create dividers within my photobooks for interest or to highlight a special section.  You can do this by using a 6x8 template or even a large single 6x12 template.


Using some cute washi to highlight an important section of my photobook
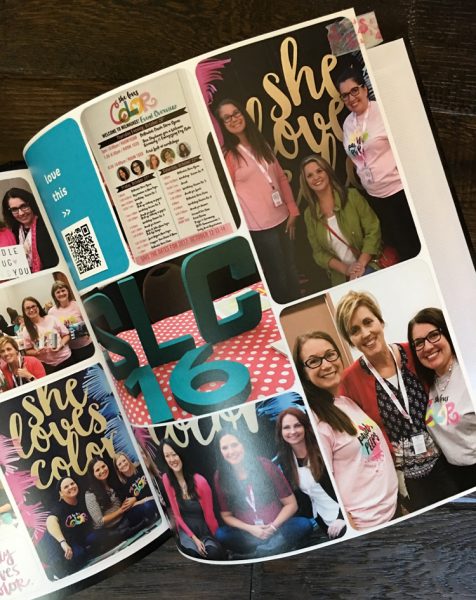


Here using an 8x10 template - with an Avery self stick label. I still upload the full page and then trim with a paper trimmer after it arrives

Hope this gives you the confidence and motivation to go out and get your pages printed in photobooks or even in single pages - whatever form you decide.  The most important thing you can do is to get your pages out of the cloud and into a physical form where everyone can see your beautiful work and share your memories.
As always if you have any questions - or there are other things you would like me to share about my process - please let me know.


Sunday, November 6, 2016

How to Add QR codes to Project Life pages


We live in such a multi-media world - videos, music and photo montages are everywhere - and I think they can really enhance our Project Life pages.  Imagine being able to add the video of your child's Christmas pagent performance right along with the photos.  We have been having too much fun here in Chicago with the Cubs winning the World Series.  So along with all the great images that are available on the interwebs I also wanted to add some of the exciting game highlights videos and as well the music that has become a hall mark of this season.  The one that struck me first was a "music" video done by  Eddie Vedder and posted on the official Chicago Cubs site as a thank you to the fans... I know that I will be completing several more pages with the additional QR codes since there are a lot of moments that I want to capture for my grandchildren and the generations after that (..who knows how technology will change but they will have a work around too!)


First thing you need to do is to find the best link - I suggest a YouTube link since that is the largest platform and most tech stable - i.e. is not likely to go away anytime soon! I copy the link from the search bar


After you have the link you open up a QR code generator.  There are several free sites available to do this easily.  I have used both QR Stuff and QR Code Generator.  In this example I am using QR Code Generator.  There are many QR code Generators in the iTunes App store and the Google Play store as well so it doesn't matter what kind of hardware you are using.

Paste the address from the YouTube video in the generator box and then hit the Generate QR Code button. The website does the rest for you.  The QR code generator does the rest and you can download. 


 You can do the same on your phone - that is the great thing about these QR codes - they can be generated right in the palm of your hand. I will show you that next. Using your phone there are a couple of easy steps that are similar.

You find the YouTube video that you want to generate the QR code for. There is an arrow button at the top that will bring up a screen where you can copy the link.


Next you can you go the QR code generator app and paste the address where is says URL and hit done:


Finally the QR code appears and you can hit the share button on the top right corner and then you can save the image to your camera roll.


There are lots of programs that will allow you add images to your photos or even completed Project Life app pages. I really enjoy using Photo - a free program although there are others that can do this as well.  In this program you can even upload you own fonts ( I even uploaded my own handwriting font) to add more text or larger titles. It also allows you to layer on a QR code.  


Use the Add Image button to select your QR code


Finally - size and place the image where it works on your layout or photo.

Here is 1 more example where I added a QR code to document the Marching Band parade..


Hope you enjoyed this tutorial!


Friday, September 23, 2016

Project Life App roundup

I've been doing lots of catching up on my  Project Life for 2016 in the last week since Becky Higgins had a sale on her kits in the Project Life app. Don't know about the app, here is some additional
info on Becky's website. 

The app is the handheld version of Becky's Project Life memory keeping system. You can make it as complicated or as simple as you like. Daily, weekly, monthly or event scrapping. Whatever is the most important for you to document- this system can help you- and you can include lots of pictures or stories. 

I think part of the reason I've been so inspired is that I really took a look at some of the kits again with a fresh set of eyes. When the app updates come out- I somehow convince myself that I don't need that kit ... However at $.99, they were much easier to buy even for just a few cards that I love within a kit. 

I am nearly a 100% Digi scrapper so I already use lots of tools to make using the PL App easier. I use Dropbox and lots of phone editing tools on my phone and editing tools on my laptop/ computer. I even got an Eye-Fi card recently ( I am still learning about this great tool to allow DSLR photos transferred directly on your phone or computer) to make my process easier. 

I am fortunate to be on a few CT teams so I try to use photos that I want to scrap as part of my assignments, but that still leaves me with lots of photos and gaps in my documenting. I am not sweating a weekly format, but pretty much I end up with nearly a page or 2 a week.  

So back to my new love of the app. The most recent update allows you to directly edit your photos in PicTapGo, an app by RadLab. It has been LIFE CHANGING - I know it seems an extreme statement but I love the ease of not having to move in and out of the app to edit photos. Plus my biggest pet peeve is photos that are
croocked. You can fix that in PicTapGo too!! Wow!! Now you really can complete a page while riding in a taxi or waiting at the airport. ( and even finish a blog post!)

So let me get started on sharing some of my recent goodies. 

I often look at the primary photos I want to document and I pick a page protector from that. If I have few more pictures to include I use the collage function in the PL App to create a collage for one of the pockets. Her Design A and Project 52 2016 Edition by Amber LeBau with the Project 52 overlays. 

 Here is used Design A again but with a collage in the bottom left. To document our Scrapbook Expo day! Card kit is Currently edition by One Little Bird. 


I actually went out on a limb and combined 2 kits with another Design A, ha! Inspire has the beautiful watercolors and Everyday edition by Liz Tamanaha has great black and white cards! I used Phonto to add the curved text and the title with a white background for the title. 


Went back to an oldie but goodie using Cobalt edition cards and a photo collage. I used Photo here ( but you can use Rhona Designs and several others) to add text to your photos. One trick I use when the photo is too busy for my text to stand out is to use a very transparent grey box behind the text. All done in Phonto. 


Love this page using Design U with the doors of San de Allende, a beautiful colonial town near Mexico City. I used just one card from the DIY Shop value kit and some great elements from Rhona Designs to add just the right touch to this page.  So many great photos and I was able to tell the story of our trips on other pages so this one really just needed photos!


Here to document pages from my sons graduation I used Capture Life kit and Squared Away 13 template. This kit has some great square card options which not all kits do. However one trick I learned is starting with a standard size,  say Design A for example or using a larger spot on your current template, and then you can then move a 4x6 or 3x4 card to that slot. 
I also really liked how I was able to use my panoramic photo on both photo slots on the bottom of this template. 


The newest app update has blank solid colored cards which match each kit. There are so many possibilities! You can use it to add additional journaling right in the PL App or Phonto or Rhonna Designs if you have a different font that you want to use. One of my favorite things that I have done as a scrapper is to have my handwriting turned into a font. It's a great way to document yourself in a lasting way- especially when you are a Digi scrapper!

Another great option for these blank cards is as a base for all the cool graphics and word art that are available in apps like Over and LetterGlow. I love some of the options out there. Why not take advantage of all the great designs out there by professional graphic designers to add a little sumpthing sumpthing to finish off your page. 


I'll close this post up with a few more PL app page goodies to share! Hope you all have a great weekend - take lots of pics so that you can scrap them on your Phone!


Sunday, July 31, 2016

July Roundup!

I haven't posted my June round up and since we are in the last day of July just wanted to catch you all up with my latest digi endeavors...


The first page was created in the Becky Higgin's PL app, including the journaling!. While I did my favorite project ever documenting my anniversary trip in a Midori traveler's notebook, I will also include digi pages in my regular project life album - and PL app makes it quick and easy to get those pages done!


Using Just Jaimee's Ready to Go pages to document one of my weeks in June.  I love these completed pages - they are already embellished but allow you tons of freedom to decorate it fit your photos. I am currently using a monthly approach -so you can change the template to fit any dates you need


A July Challenge at The Lilypad to use 3 BYOC products on 1 layout! I LOVE these travel journal templates from Scrapping with Liz, along with Mommyish So Knotty and Forever Joy Designs Summertime Blues


Using Libby Pritchett's and Amanda Yi's most recent collab Celebrate Independence


Using Melissa Bennet's Calm. Originally part of the Digi Files, now available in her store as well.


Using Libby Pritchett's Brainstorm  and a fun challenge template by Miss Mel's templates


Using a triple scoop from Libby Pritchett, Becca Bonneville and Erica Zane Leggings are Pants. Although I haven't quite succumbed to the mania over LuLuRoe - the kits was adorable with my niece's pics!


Using Libby Pritchett's And Just for All with another fun template by Miss Mel coming soon to her Etsy store


Another fun Lilypad Challenge layout for the July challenges using a Just Jaimee & Mommyish kit Are We There Yet and the freebie template from Kate Hadfield


Using Just Jaimee's July Storyteller and the July Challenge template from The Lilypad and Pink Reptile Designs


Using Just Jaimee's Pocket Pages from June 2016 pages to document one of my weeks. The main storyteller kit includes lots of extra goodies. 


Hope you've enjoyed the roundup! I hope to get lots and lots of pages done for August too.