Friday, April 29, 2016

Capturing Right Now in Life through Project Life Memory Keeping


Capturing Right Now with Project Life App in Hybrid Layouts. I share what printer I'm loving, too. www.paintedladiesjournal.com


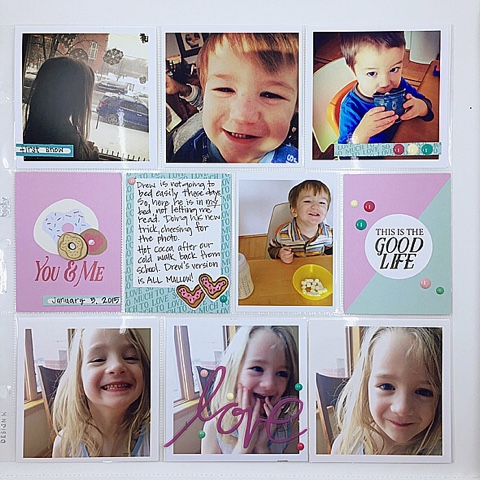
In this Project Life Layout, I'm using the Everyday Core Kit that I purchased on the Project Life App to document something that has been occurring regularly in our house with my two-year-old. I am loving this layout and want to incorporate more of these kind of pages in my albums.

Capturing Right Now with Project Life App in Hybrid Layouts. I share what printer I'm loving, too. www.paintedladiesjournal.com


Capturing Right Now with Project Life App in Hybrid Layouts. I share what printer I'm loving, too. www.paintedladiesjournal.com
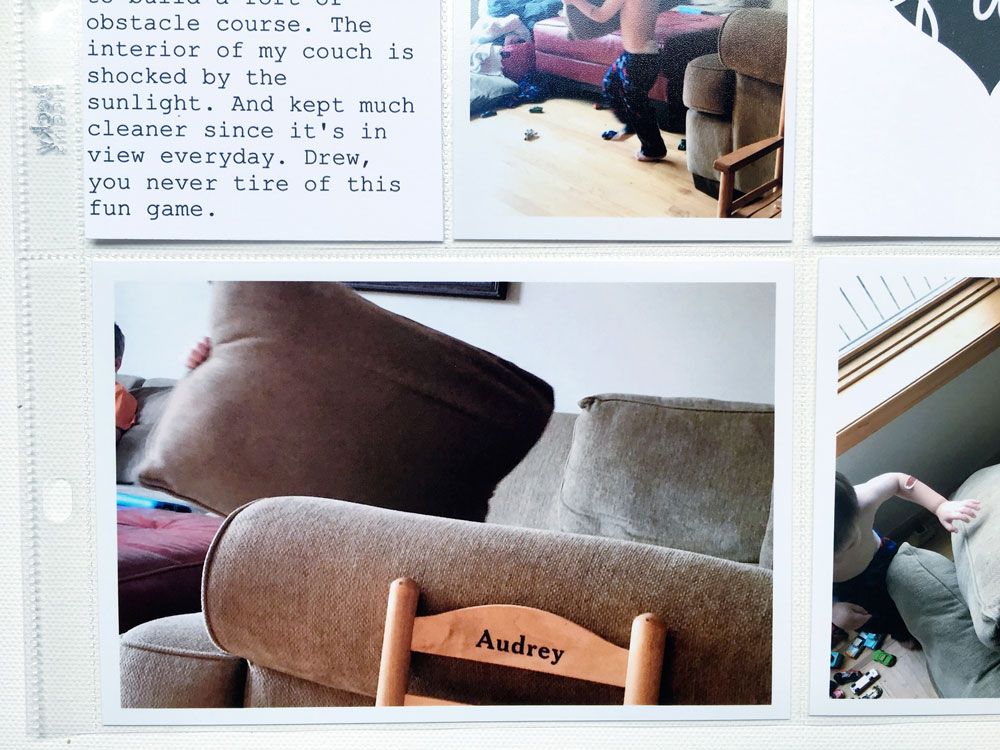
I was sitting and drinking my morning coffee, as I watched for the umpteenth time as my son unassembled our couch cushions in his fort-building efforts. Look at this bottom left photo! It was so cute to watch him carry these giant pillows to his "spot". All I could see was a hand on either side of the pillow.

Capturing Right Now with Project Life App in Hybrid Layouts. I share what printer I'm loving, too. www.paintedladiesjournal.com
After watching his building from my chair for a few minutes, I decided to get some shots from a different angle. I love overhead shots that give a new perspective.

Capturing Right Now with Project Life App in Hybrid Layouts. I share what printer I'm loving, too. www.paintedladiesjournal.com
I've been allowing myself to buy a new $1.99 or .99 card set in the Project Life App every once in awhile. They are fun to have and I love that I can print them with square edges. I've been printing my photos with white borders and love the squared edges on the cards. It looks clean and crisp.

I've talked in past posts about how I pre-plan my pages using the Project Life App. It has done a few things for me to better my PL Process.
  1. I've drastically cut down on the amount of photos that I print (and don't necessary use)
  2. It helps me keep up with the journaling.
Click on the badge below for the Project Life App for iOS or here for the Android Project Life App.


I'm currently working on a detailed tutorial for how I use the Project Life App for planning and keeping up, so sign up for the Painted Ladies Journal Newsletter here or click the image below to be notified when that comes out. It's been on my to-do-list for awhile and I'm excited to finally be sharing this with you.


If you are going to start printing your own cards from the app, I highly recommend getting a home printer. I have bought a Canon Pixma the last several times and I love them. I'll tell you why. DISCLAIMER: I'm not a printer expert, I can only share with you what I have experienced.
  1. They let you keep printing to squeeze out the last drops of ink from each tank. (Which is OK, if you are just printing something from the web or other 8.5x11 stuff. Not a great idea, if you are printing cards or photos). Some other brands stop printing when an ink cartridge gets to a certain low point, even if there is still ink.
  2. You can use third party inks. Again, a little disclaimer, some would say you should ONLY use Canon ink in a Canon Printer for the best quality prints and to keep your printer running for a long time. I haven't had any problems.
  3. It has a 4x6 tray.
  4. I can use the same machine to print 8.5x11 stuff. And I can scan or copy with it. I'm all about having less items and can do more tasks.
  5. You can pick up a Canon Pixma for a very reasonable price.
Below is the model that I currently own and am loving for quick layouts. Now, I also like to print bigger batches through my favorite print lab, Persnickety Prints. The majority of my photo prints come from their lab, which are high quality and will probably have a much longer life span in my archival albums. But, for those projects you don't want to wait on photos for, or to print cards, I use my trusty Canon Pixma. I use the matte paper for cards and the photo paper for photos.


Disclaimer: Some of the links in this post are affiliate links. I ONLY provide affiliate links for items or services that I truly love and stand behind because they deserved to be shared. If you choose to shop with me today, a small percentage benefits this blog and doesn't cost anything extra to you. Thank you so much.

Thanks for joining me today!
-Holly
Connect with us on Facebook. Follow us on Instagram.


Tuesday, April 26, 2016

I'm Your Favorite - A Card for Your Sweetheart


I spent Saturday afternoon "killing the kit". This is definitely a new record for me. I received my April Take 10 Kit from The Studio 29 Designs, LLC and had to wait until Saturday to start creating. This kit is beautiful, so it wasn't a hard task. I was on a roll.  Here are the first few items I made. I love black and white photos. I made a whole layout with them and a few select cards and a stamped embellishment from the kit.


Using black and white photos in your Project Life layout
Drew and I were taking some selfies while his brother napped next to us. It's so important to get in the photos. Selfies are an easy way to do that, especially when they are with your kids, your pet, your current favorite book. Whatever it is, take a selfie with it, or them. lol. You will be glad that you did years from now.

Using black and white photos in your Project Life layoutI loved the dandelion card. I added a tiny yellow enamel dot to it. Blue and yellow are opposite on the color wheel - that color wheel is a good bit of reassurance when selecting colors that look good together. Opposite colors are complementary, and when put together create the most contrast. Colors next to each other are called analogous, and are also a good choice.
Check out those hashtag stamps! What a great set for use on lots of Project Life style pages.

Using black and white photos in your Project Life layout. Chalking stamped embellishments

I used the flower stamp from April Take 10 Glam Bag (exclusive set only available in the kit) and then used my chalk set to color it in. I love to break out art supplies!

I'm Your Favorite Card www.paintedladiesjournal.com


When I saw this card, I thought maybe I'd do a layout about my husband or BFF, both great ideas. But then, I thought, wow, it'd make a great birthday card for my hubby! I had a yellow card and envelope from my stash.


But they were way too big to use with this 4x6 card, so I trimmed them both down. Yes, even the envelope! I used the mounted card to measure what size to trim the envelope.

I'm Your Favorite Card www.paintedladiesjournal.com
After making a few more free-hand cuts with my scissor to make it look like the original envelop, I wrapped the edges with some of the washi tape that came in the Glam Bag.

I'm Your Favorite Card www.paintedladiesjournal.com
And done! Here's the little detail that I added to the bottom right.

Have fun with those April Take 10 Kits. If you didn't get one yet, here are links to each kit:

April Take 10 Glam Bag
April Take 10 Pocket Kit

Follow me on Instagram and Facebook!


Monday, April 18, 2016

Happy Day Stamp and Washi Tape Tip!

Hi Crafty Friends! How did you use your exclusive "lucky" wood veneer from Studio 29 Designs, LCC March Take 10 Kit? I love how thin it is. 


I contemplated using the other similar blue 4x6 card in that upper left spot, but I just have too many photos I wanted to use (typical me). That photo especially needed to stay because that would be the last time we visited that neighborhood establishment (which had been there since our younger times first living in the city) before it was sold to become something else. I'm a little sad about that but excited to see what new place is coming.


I chose to back my "lucky" veneer with a stamped image from one of the stamp sets this month in the shop, called Happy Day.


I stamped the outline image of the branches on white cardstock first, and colored the leaves in with my  Stampin' Up Stamp & Write marker set. Next, I stamped the solid branch image in a little shade of bluish-green over top. Then, I fussy-cut it out to layer behind that wood veneer.


I love that this marker set is double ended (fine point and brush tip). I use them for journaling, stamping, and coloring! If you don't have a Stampin' Up demonstrator, you need one and I've got one for ya. Mary Talbot is one of my besties: Stampin' Up - Mary Talbot. Another little "something about Mary", she makes really awesome planner stickers that you can find on Etsy. Follow her on IG for the info: www.instagram.com/plannerwhimsy 


I used the washi tape from the kit, but I wanted it to be skinnier strips for this application. I have a little tip to share about washi tape that rocked my world the first time I heard it (I don't remember where that was, or I'd give them credit!) Woo Hoo! It peels right off and isn't stuck to your scissors or anything else.


I love little tips like that. What little tip do you have that you wish you knew before?


Other posts you may like: 


I use a Canon Pixma to print at home. Here are a few affiliate links, if you so chose. I print some of my photos and home any journaling I decide to print.


Pinkfresh Studio - Felicity Collection - Block Wood Stickers - Color Hero Arts - Kelly Purkey Collection - Ink Pads - Urban

Friday, April 15, 2016

First Quarter 2016 Crafty Goals Revisited

Did you set some crafty goals for yourself at the beginning of the year? Time to check in with each other and see how we are doing! I gave updates in bold below. This is a great way to keep yourself on track! I just had another idea for a Midori Insert - Tracking my crafty goals!! That way it's something physical that I can look at more often!

Please note that most of the product/service links throughout this post are affiliate links. Our blog makes a small amount if you click through and decide to purchase something, at no added cost to you. We thank you for supporting us!
Go here to see the original 2016 blog post.
 Update on 2015 Goals: 
 Ok, I do need to improve upon the "Organizing my Stash" goal. I did pull stuff and put them in some awesome IRIS containers, (image link below to a bundle of 4, I have 2 bundles!) but I feel like I just moved stuff around and still have too much stuff that I don't use. So, I'm going to re-do this goal. I'm going to go box by box and drawer by drawer (in my fave IKEA furniture above) and be ruthless! Anybody here a Konmari fan? If it doesn't spark JOY, tell it thank you for serving its purpose and get rid of it/give it away. Well, most of my stash sparks joy, so this may be difficult. 😂
I will be doing a post soon on how I used these boxes, so stayed tuned!
  
Goal #2 was working on 2 years at once. 2014 and 2015. I did kind of do this, but not in the way I originally intended. Since that post I have had the amazing opportunity to be on the Take 10 Kits Creative Team for The Studio 29 Designs, LLC. It's a dream! I love it! It keeps me scrapbooking on a weekly schedule! I found that having all of my 2014 not done became a very positive thing. It was much easier to look at the current month from a year ago and pick photos to create my layouts/projects each week. A whole month of photos to work with that work with that month's kit! So, I completed a lot of 2014, but also did the occasional 2015 layout if it made sense. And I will continue the same way this year. I put my pages in chronological order, but have also given myself the freedom to skip around between the current and previous year! It's liberating! 
Goal #3 was doing more pre-planning for Project Life. I do this, but my approach changed! I mainly use the Project Life App to record which photos and write out the journaling. I did a post on that last year, find it here. I only use the PL App now for planning! It's great. I should do an updated post on my process! Because, it's evolved...
New Goals for 2016: I'm gonna get a lot more specific here.
  1. Finish DD2015 (so close!!!)   I did this! I just need to create a finished project post to share!
  2. Put together Shutterfly Photobooks for previous year's professional family photos. I want to go back to the year my oldest was born, so that is 2009, 2010 and 2011 that I need to create. And make some Christmas Card books, like Luly has been doing! Here's a Shutterfly link, I'd love if you used on your next order.
  3. DONE! I did a review of Amy Tan's class hereFinish my Craftsy Online Classes! I've started one with Amy Tangerine. I love her tips and style. I immediately had new ideas to use. And next up is a Mixed Media class with Olya Schmidt (Paint Paper Studio!). Sign up for Craftsy classes here.  
  4. Set up and make current my kid's School Albums! I plan on doing a post to share more about what I'm doing there. My oldest is only in First Grade, so if I can do it this year, I think it's totally manageable. I have been hunting for 2 each of solid color leather 12x12 albums! I'm 2/3rd  of the way there. I still need albums for my youngest that starts PreK in the Fall. I've been researching what I want to do for each! 
  5. Finish my #LoveWhereYouLive album that I did withLittle Paper Projects. If you sign up for any classes with them, tell them Holly Genc or Painted Ladies Journal sent you! They have a nice affiliate program. I've made progress but still need some photos for my last week. And I'd like some more photos for the first week. I did get all the covers and dividers done. Hope to do a post in the next few months on the final project!
  6. Finish my Midori Traveler's Notebook I started for our Oregon trip. I got a new brown leather Midori I found one that is beautiful. I just love it! Go here for a post I did on this book! And here's the Midori I purchased:
  7. I added to it recently! See custom insert cover below. And I'm getting ready to order more (hopefully the rest) of the photos to go in it!


  8. And lastly, I want to try out the Shotbox that Luly got. It's just awesome and I might need my own. She just did a review on it. Go see what she says, here!  I did get a chance to use it! Go here for my review! "I Tried the Shotbox For Photographing Stuff!"
Ok, I could keep listing things, but I'm gonna start with these!! What do you hope to accomplish this year?
Well, I hope I do better at the next update to this list. ;) I hope I have inspired someone else to check in on their own goals or to set some goals for the year!
Thanks!


Wednesday, April 13, 2016

I Tried the Shotbox for Photographing Stuff!

My co-blogger, Luly, got a Shotbox recently. Did you see her review about it? Go here "Is the Shotbox the Answer to Your Scrapbooking Goals?" for her first thoughts. I got a chance to try hers out awhile back when we got together to scrapbook. I brought a pile of my kid's artwork. I also used it to photograph a few of my Creative Team layouts.

Here are my thoughts upon my first use:

1. I really like that it folds up for storage. I do not have a dedicated crafty space so I can't keep it out all the time.
Shotbox Review by Holly from www.paintedladiesjournal.com
2. The number one selling point to me: you can take your photos whenever you want. No waiting (or rushing) to get photos near your favorite window. Need to take them at night, after work or after kids are in bed? No problem. The image below shows the black background. I prefer white, which it comes with, too. It's actually a white backdrop that covers the bottom and back of the Shotbox.
Shotbox Review by Holly from www.paintedladiesjournal.com

3. I think it's rather perfect for kids art. I have a bunch and I got through a stack super fast. I did still edit and crop all the photos but I basically did the same recipe in the Pictapgo App on each of them and was done in a flash. The picture on the left is unedited with my iPhone taken in the Shotbox. The picture on the right was the same photo edited in Pictapgo to lighten it and warm it up just a tad.
Shotbox Review by Holly from www.paintedladiesjournal.com


4. I also used it for a few Project Life Layouts. The only thing here that I noticed was if you want to take pictures from an angle other than the sideshot, you want to be careful not to get the sides of the box in it.
Shotbox Review by Holly from www.paintedladiesjournal.com

Shotbox Review by Holly from www.paintedladiesjournal.com


What do you think? How would you use the Shotbox. I'd love to take it to my parents' house to get a bunch of shots of heritage photos.

Please use our affiliate link to get your Shotbox

Thanks!

Monday, April 11, 2016

Pocket Page with March Take 10 Kits

Today's layout inspiration is a typical Project Life layout. A little bit of what was going on that week last May 2015. A fun playdate. A tale of sickness hitting the three kids. A good friend's thoughtfulness. A fun night at school with the family.

Pocket Page with March Take 10 Kits www.paintedladiesjournal.com

 I had a lot of stories to tell here. Anytime that happens, I typically print my journaling. I did a tutorial last week on how I discovered a quicker, easier way to print my journaling, when I want it to go on top of a physical card. Jump over here to see more on that. 

Pocket Page with March Take 10 Kits www.paintedladiesjournal.com


For this 4x6 card from the March Take 10 Pocket Kit, I chose to print my journaling on vellum so that the pattern would show through. I added those two stickers from my MAMBI stash and the wooden heart is PinkFresh Studios from the Take 10 Glam Bag (sold out, sorry! Hint: Subscribe to the kits and you won't have to worry about missing out.)

Pocket Page with March Take 10 Kits www.paintedladiesjournal.com

I adore this month's stamp sets. That little singing birdie is from the Hello Spring Stamp Set. I stamped him and did a little coloring with my Stampin' Up Stamp & Write marker set. I shared my super Simple Marker Coloring tip in last week's post, Simple Marker Coloring with Stamps.

Here it is again for reference:
1. Give an all over wash of a lighter color.
2a. Determine where a shadow would naturally be (imagine the sun up and to the left for my birds) and use a slightly darker shade of same color family.
2b. Same idea as 2a, but just use more layers of the same marker you used for the wash to make it darker.


That marker set is very versatile. They are double ended (fine point and brush tip). I use them for journaling, stamping, and coloring! If you don't have a Stampin' Up demonstrator, you need one and I've got one for ya. Mary Talbot is one of my besties. She'll hook you up. Her site is here: Stampin' Up - Mary Talbot. In case you don't know, they sell exclusive Project Life sets, too. Check it out. Another little "something about Mary", she makes really awesome planner stickers that you can find on Etsy. Follow her on IG for the info: www.instagram.com/plannerwhimsy 

Pocket Page with March Take 10 Kits www.paintedladiesjournal.com

I have one more Project Life tip to share today. The bottom left 4x6 photograph was created with the PicStitch App. I chose a layout that would allow a 4x4 and a narrow side panel. I brought in a pattern to the narrow side panel and changed it to black & white right in the PicStitch App. Then, I exported that to my cameraroll and brought it into the Phonto app to add the journaling and "BlaineFlix". 

Thanks for reading!

You may also like this post with more detail on using PicStitch.

I use a Canon Pixma to print at home. Here are a few affiliate links, if you so chose. I print some of my photos and home any journaling I decide to print.
 
When you are buying vellum for running through your printer, make sure it is for your type of printer. Here is a link to vellum for an inkjet printer:
    

A few other supplies used:

Pinkfresh Studio - Felicity Collection - Block Wood Stickers - Color