Showing posts with label project life app. Show all posts

Thursday, April 27, 2017

Creating & Printing Two 3x4's on a 4x6 for Hybrid Projects

I created this post for the Amber LaBau Blog first, and it can be found here. My version here includes some shopping links at the bottom, sharing apps and products that I like to use for this process I am sharing today. Some are affiliate links.


Holly | www.paintedladiesjournal.com
With "Week in the Life" (by Ali Edwards)  just happening last week, I thought I'd share a few ways that I print for this type of hybrid project. I use a combination of pocket pages and full size 6x8. Therefore, I mainly print 4x6, 6x8 or (2) 3x4's on a 4x6 for this project. I split this post into two parts to share two different ways to create and print (2) 3x4's on a 4x6 at home. I have a Canon Pixma printer, iPhone 7 and Windows 10 Laptop. I think most of this tutorial can be applied to any device, but keep that in mind.

PART ONE: CREATING THE PROJECT LIFE APP

There is something to be said about prepping hybrid pieces on your phone. It can be done little by little, when you have time, ANYWHERE. (If you just don't like working on your phone like this, I suggest www.picmonkey.com  or Photoshop/PSE to do this step) So, let's look at the PL App for setting yourself up to print 2-3x4's on a 4x6. These can be journal cards or photos. I like to print journal cards on matte photo paper or cardstock and photos on semi-glossy or glossy photo paper. For this reason, I always group either 2 journal cards or 2 photos together.

Holly | www.paintedladiesjournal.com

Here's the first screen, when you open the Project Life App. Pick the upper left picture.

Holly | www.paintedladiesjournal.com

Now you see this screen, and you are ready to pick your photos or journal cards. Save what cards (and photos, if they aren't on your phone already) that you want to use to Dropbox ahead of using this app and you will be able to access them.

Holly | www.paintedladiesjournal.com

Whether you are wanting to print cards or photos, when you are accessing from Dropbox, you will select the "add photo" icon.
Holly | www.paintedladiesjournal.com

On this screen, scroll down toward the bottom to find the Dropbox option. Then, find your cards and photos you saved. If you want to add typed journaling before printing, you will not be able to in Project Life because it thinks you brought in a photo. But, you could bring it into another app like LetterGlow or Over (Luly talked about this in her post on App Scrapping).

Holly | www.paintedladiesjournal.com
So, I've brought in two photos for my WITL project that I want to print as 3x4 photos. One with journaling that I typed in the app, Letterglow, before bringing in here. Select the bottom right icon and then select "Export".


Holly | www.paintedladiesjournal.com

You can export it to a number of places. If you are printing from your phone, just save it to your camera roll by selecting "export" and then "Save Image", shown above. If you are printing from your computer, you can save back to Dropbox OR "Save Image" and import from your phone's camera roll.

Now, you are ready to print! I like to buy the canon 4x6 papers for printing at home on my Canon printer. Go here to see links to products I use. I prefer to print from my laptop because I have more control, but have printed plenty from my phone! I did a more detailed post on printing from your phone here.

PART TWO: CREATING & PRINTING WITH THE CANON PHOTO SOFTWARE

I use a Canon Printer and have the Canon - Easy Photo Print EX software installed on my laptop. I really like that I can create 2 3x4's on a 4x6 right in the software. One less step! It is great for photo printing. The following is a quick peek at how it works. I like to use the Letterglow or Phonto App to write on top of any photos that will get journaling before printing. One tip: keep track of what scale or size your font is, so that you can be consistent throughout the project.
Holly | www.paintedladiesjournal.com

Upon opening the software, you will see this screen. Select "Photo Print"

Holly | www.paintedladiesjournal.com
There is a panel of buttons on the left-hand side that you basically go through one at a time in order. Hit the "Select Images" button as shown above, then find the photos on your computer. Pick two photos, or any multiple of two if you are printing several at once.
Holly | www.paintedladiesjournal.com

Next, hit the "Select Paper" button on the left side. Select the 4x6 and correct type of paper (I suggest glossy for photos and matte for journal cards).
Holly | www.paintedladiesjournal.com
Here's the neat part. You select the option for "x2", or 2 photos on one page. You can rotate each panel, if needed. You can select borderless or with borders. I like borders!

Holly | www.paintedladiesjournal.com

One last thing to check. Under Preferences, you want to check that the "Amount of Extension" is set to NONE.

Holly | www.paintedladiesjournal.com

Here's a few of my prints. I'm using some of Amber LaBau's "Project 52 2016 Edition" in the Project Life App. They are kinda PERFECT for this project. Day of the week cards! When creating images from different platforms (for instance, I'm using both the PL App and Letterglow), do a couple of test prints of images to compare font size before going crazy and creating all your images for your project!

If you are not using photo printing software, the best tip I can give for printing at home when you want to print (2) 3x4's (this also applies if you want white borders) is to make sure you have selected Borderless Printing and then you want zero extension. Most printer have something called "amount of extension". On Canon, it's under Page Setup and it's a slider bar I pull all the way to the left. Otherwise, it will zoom in and cut off a little bit of photo. This is the default setting. Make sure your 4x6 paper is lined up in the machine well and print!

Thanks for joining me today!
Holly Genc

Products I like for this hybrid project:


LetterGlow - Graphic Design & Photo Editing - The Lens Lab Pty Ltd


PicTapGo - Totally Rad! Inc.


Phonto - Text on Photos - youthhr

Wednesday, October 19, 2016

How I use the Project Life App to Plan and Keep Up in my Physical Albums

Are you a physical Project Lifer? I know, I like holding and creating physical layouts. It gives me joy. Think you have no need for the Project Life app? Think again. I'm going to share with you how I use it to aide in my physical pocket page layouts.

Project Life App for planning physical pages - Holly www.paintedladiesjournal.com


It's not just about pre-planning my pages. It's also a way for me to get some journaling done while it is still fresh in my mind. I love capturing the details that I know I won't remember later. 

I'm not going to go into how to create layouts, there are lots of good ones out there. Becky Higgins has done it here.  I'm going to show you how I organize and set myself up to print the photos. I will note that I don't worry too much about which journaling cards I am using in my app layouts because I usually use something different later, BUT sometimes it's so perfect I just print the journal cards, too.

Project Life App for planning physical pages - Holly www.paintedladiesjournal.com


So after you have created your page, you can save it by the date the photos were taken. Click on the "More Options" under "Completed Pages".

Project Life App for planning physical pages - Holly www.paintedladiesjournal.com


From here, you will click on the page you want to update and select "Update Page Info"

Project Life App for planning physical pages - Holly www.paintedladiesjournal.com


Correct the date to match the layout photo date. There is a spot for a "name", too. I usually put in here a code "PPx", meaning that I have uploaded the photos to Persnickety Prints for this layout.

Project Life App for planning physical pages - Holly www.paintedladiesjournal.com

You want to either export these and save them by date in a Dropbox folder (I do this so I can flip through them easily in order and see what type of pocket page I need next, if it's not the typical Design A.) or leave them all in the PL app. Then, you can go back and refer to the layout configuration and the journaling when you sit down to scrap.
Project Life App for planning physical pages - Holly www.paintedladiesjournal.com

I have a folder in Dropbox called "Project Life" where I save them by year-month day format so they save in chronological order.

Project Life App for planning physical pages - Holly www.paintedladiesjournal.com

Next up, order those photos, if you are batch ordering from a service like Persnickety Prints. And when they arrive, do the happy dance and start filling in your pocket pages!! I just love white borders!

Project Life App for planning physical pages - Holly www.paintedladiesjournal.com

Now, I like to skip around and do which ever page goes with what products I'm excited to work with. Eventually, it'll all be done and in chronological order. Look at all those pages layed out and ready to be scrapped. The best part!

What is your process for getting photos in your albums? I know this may seems unusual but my process has totally evolved for the better (for me) over the last year. It's working and I love it. I'd love to hear your ideas for getting your photos printed!

And if you want more ideas for using the Project Life App as a physical scrapper, Becky Higgins wrote a great article showing lots of other great uses the apps specifically for this. Find it here.

Go here to purchase this app (this is an affiliate link, thanks! Affiliate links send a few pennies my way and do not cost the purchasers anything extra)

PROJECT LIFE APP iOS
Project Life - Becky Higgins LLC

This is my favorite editing app - the brighten action is worth the whole app.
PicTapGo - Totally Rad! Inc.

Friday, April 29, 2016

Capturing Right Now in Life through Project Life Memory Keeping


Capturing Right Now with Project Life App in Hybrid Layouts. I share what printer I'm loving, too. www.paintedladiesjournal.com


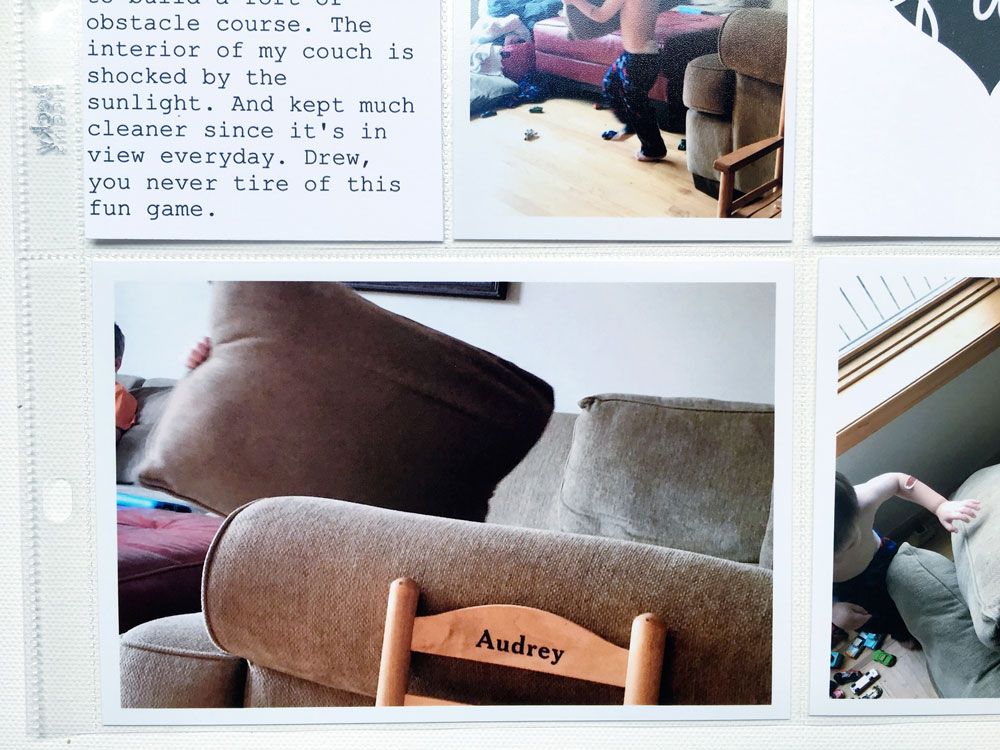
In this Project Life Layout, I'm using the Everyday Core Kit that I purchased on the Project Life App to document something that has been occurring regularly in our house with my two-year-old. I am loving this layout and want to incorporate more of these kind of pages in my albums.

Capturing Right Now with Project Life App in Hybrid Layouts. I share what printer I'm loving, too. www.paintedladiesjournal.com


Capturing Right Now with Project Life App in Hybrid Layouts. I share what printer I'm loving, too. www.paintedladiesjournal.com
I was sitting and drinking my morning coffee, as I watched for the umpteenth time as my son unassembled our couch cushions in his fort-building efforts. Look at this bottom left photo! It was so cute to watch him carry these giant pillows to his "spot". All I could see was a hand on either side of the pillow.

Capturing Right Now with Project Life App in Hybrid Layouts. I share what printer I'm loving, too. www.paintedladiesjournal.com
After watching his building from my chair for a few minutes, I decided to get some shots from a different angle. I love overhead shots that give a new perspective.

Capturing Right Now with Project Life App in Hybrid Layouts. I share what printer I'm loving, too. www.paintedladiesjournal.com
I've been allowing myself to buy a new $1.99 or .99 card set in the Project Life App every once in awhile. They are fun to have and I love that I can print them with square edges. I've been printing my photos with white borders and love the squared edges on the cards. It looks clean and crisp.

I've talked in past posts about how I pre-plan my pages using the Project Life App. It has done a few things for me to better my PL Process.
  1. I've drastically cut down on the amount of photos that I print (and don't necessary use)
  2. It helps me keep up with the journaling.
Click on the badge below for the Project Life App for iOS or here for the Android Project Life App.


I'm currently working on a detailed tutorial for how I use the Project Life App for planning and keeping up, so sign up for the Painted Ladies Journal Newsletter here or click the image below to be notified when that comes out. It's been on my to-do-list for awhile and I'm excited to finally be sharing this with you.


If you are going to start printing your own cards from the app, I highly recommend getting a home printer. I have bought a Canon Pixma the last several times and I love them. I'll tell you why. DISCLAIMER: I'm not a printer expert, I can only share with you what I have experienced.
  1. They let you keep printing to squeeze out the last drops of ink from each tank. (Which is OK, if you are just printing something from the web or other 8.5x11 stuff. Not a great idea, if you are printing cards or photos). Some other brands stop printing when an ink cartridge gets to a certain low point, even if there is still ink.
  2. You can use third party inks. Again, a little disclaimer, some would say you should ONLY use Canon ink in a Canon Printer for the best quality prints and to keep your printer running for a long time. I haven't had any problems.
  3. It has a 4x6 tray.
  4. I can use the same machine to print 8.5x11 stuff. And I can scan or copy with it. I'm all about having less items and can do more tasks.
  5. You can pick up a Canon Pixma for a very reasonable price.
Below is the model that I currently own and am loving for quick layouts. Now, I also like to print bigger batches through my favorite print lab, Persnickety Prints. The majority of my photo prints come from their lab, which are high quality and will probably have a much longer life span in my archival albums. But, for those projects you don't want to wait on photos for, or to print cards, I use my trusty Canon Pixma. I use the matte paper for cards and the photo paper for photos.


Disclaimer: Some of the links in this post are affiliate links. I ONLY provide affiliate links for items or services that I truly love and stand behind because they deserved to be shared. If you choose to shop with me today, a small percentage benefits this blog and doesn't cost anything extra to you. Thank you so much.

Thanks for joining me today!
-Holly
Connect with us on Facebook. Follow us on Instagram.


Saturday, April 2, 2016

Printing Journaling from your Phone for Project Life Tutorial

Using Project Life App and PicStich App. www.paintedladiesjournal.com

Sometimes, I like to use a filler card for my journaling. I have physical cards I am using. I want to be able to read my printed journalling on top of the pattern, so I print on vellum or white cardstock to archieve this.

Using Project Life App and PicStich App. www.paintedladiesjournal.com


I used the Project Life App to do this quickly from my phone. I have an iPhone, so if you are using the app on an android, it may be slightly different.

Using Project Life App and PicStich App. www.paintedladiesjournal.com


From the main menu, select the orange image in the upper left section.

Using Project Life App and PicStich App. www.paintedladiesjournal.com

You will use the default selection if your end result will go on a 3x4 card. (And of coarse choose the 4x6, if you are using that.)

                                          
Tap on one of the 3x4's and some icons will appear in the upper right. Select the little cards with lines on them to access the card kits.


Using Project Life App and PicStich App. www.paintedladiesjournal.com

Then, select "Neutral Cards." This is a free set in the App. I like bright white, which is best on vellum. And I just like bright white cardstock, too. When filling in your story, don't worry about the margins that you cannot change. We will fix that in a bit. 

                                          
After you select your neutral journal card, you have to close out by hitting the "x". Then you will see this. Click on the pen in the center to start entering your text.

Using Project Life App and PicStich App. www.paintedladiesjournal.com

After you have both sides filled out (for two different journal cards) and have double checked your spelling and grammar, you are ready to export.

Using Project Life App and PicStich App. www.paintedladiesjournal.com


Select export and on the next screen, select "Save Image." This saves it to your camera roll.

Using Project Life App and PicStich App. www.paintedladiesjournal.com

The next step uses another app called Picstich. If you don't have this, and you do Project Life, I totally recommend it. You will need the paid version to do what I'm going to show you here. Totally worth it, to me. The first thing you need to do is select the two equal slots that are a side by side layout. 

Using Project Life App and PicStich App. www.paintedladiesjournal.com

Then, pick the 6x4 aspect ratio. 

Using Project Life App and PicStich App. www.paintedladiesjournal.com

This is the step that is only available in the paid version. You can adjust the thickness of the white border. This is what fixes the size of your card so that it is smaller than your Filler Card. This image above shows approximately what I chose to make this work. (I use this paid feature for thickening the border when putting 2-3x4 photos on a 4x6).

Using Project Life App and PicStich App. www.paintedladiesjournal.com

Now you are ready to import that image of your journaling that you made. You will import the same image twice and line it up to show each card on each side. 

Import to your camera roll and you are ready to print on a 4x6 cardstock.

Using Project Life App and PicStich App. www.paintedladiesjournal.com

Using Project Life App and PicStich App. www.paintedladiesjournal.com

Using Project Life App and PicStich App. www.paintedladiesjournal.com


Why I like this: I used to open Word and make individual text boxes after measuring my cards. I'd have to fill an entire 8.5" x 11" to feel like I wasn't wasting paper. It was lots of measuring and took forever to fill a page. I like that I can write two journal cards and fill a 4x6 to print. AND, no more measuring since I'm using the 4x6 Project Life App template.

Do you use printed journaling in your layouts? I like to mix it up and put my handwriting in there, too, but when I have a lot to fit on the card, or just want the look, I will print. I'm always looking for easier, quicker ways to get my journaling printed.

Holly | www.paintedladiesjournal.com
Facebook  Instagram  Pinterest

I use a Canon Pixma to print at home. Here are a few affiliate links, if you so chose. I print some of my photos and home any journaling I decide to print.