This post is over at the Amber LaBau Designs Blog,
here. In this post, I've added a few shopping links incase you see something you have to have! Some are affiliate links. Thanks in advance for your support of our blog.

This is my second Traveler's Notebook that I have put together during/after a family vacation. I took a few "lessons learned" from the first one (which you can find
here and
here, if you'd like a peak) and incorporated them this time around.
My favorite TN (Traveler's Notebook) Tip that I also used in my first book is the Summary Page. At the beginning of the book, I jot down a few key memories for each day. This book is brought with you for your trip. Do this each evening, before the jam-packed days run into each other in your memory. (of course pictures help, too).
Like my last TN, during my trip, I wrote some journaling of memories I wanted to document. The difference this time around was that I left more space for photos. My first book had all the journaling at the front of the book. That works, too, but I wanted to try spacing it out to add the photos that go with the stories right where they belong.
This trip was last summer, and although ideally this project would be done now, the beauty is that all the journalling already is! I just have to print the photos I want and add them in. I like to add some embellishments, too. Amber LaBau Designs has a great kit called
Sun-Kissed that is perfect for all those berry picking outings! I printed mostly blueberry themed items, but it works for all kinds of berry picking. I used my
Silhouette
to print and cut. I also used
PicStitch to create collages of my photos that I could cut apart for my TN pages.
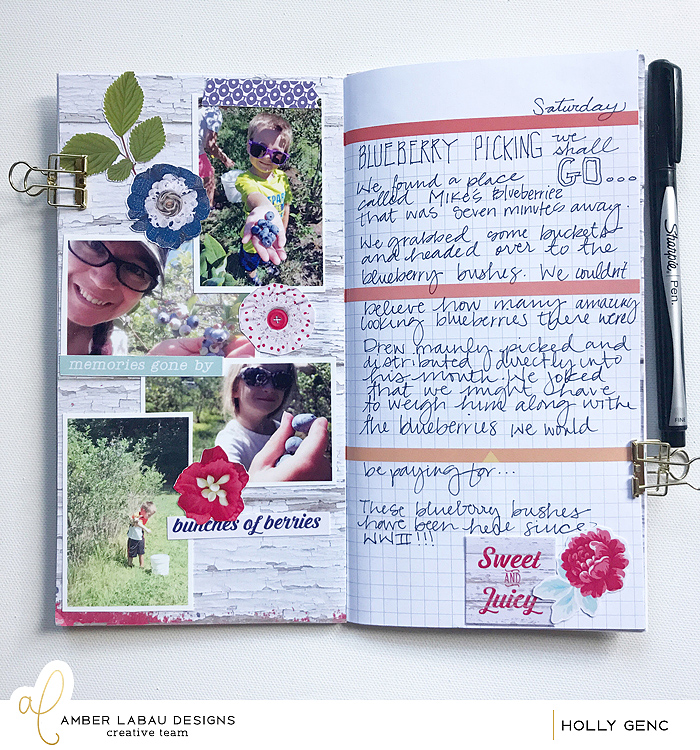
Here are the completed pages that match the previous "before image" of these pages. I chose to print a paper from the
Sun-Kissed Kit for my background. I just glued that right onto the left hand side page.
Here's the next two page spread before I did my crafting. It's beautiful as is, but I wanted to keep with the Sun-Kissed Theme and so I glued down more papers from the kit. This is a
Cocoa Daisy Traveler's Notebook that I'm using. If you want plain pages, or know you will paste in lots of your own papers, I like
midori brand blank insert refills
. Here is a great
Traveler's Notebook Bundle
.
And here's the final layout! I printed the pages as 8.5x11 on my
Canon PIXMA
. I was planning to print those on cardstock

, but they printed well on plain paper and from prior experience, I decided I'd like this book to not get too thick. My last book was soooo thick due to lots of cardstock being added. The elements and coordinating Sunkissed Washi Tapes are all printed on cardstock
(Canon Matte Photo Paper).
-Holly


No comments:
Post a Comment