Friday, June 30, 2017

The Importance of Backup!!

Up on Amber's blog today is my recommendations for the incredibly important but oh so boring computer backup tasks and some recommendations. Now that school is out and the temps are warm your mind tends to be filled with all the summer fun bucket list items that you want to check off!  Time at the pool, ice cream cones, vacations, hiking in the woods, bar-b-ques and long walks all seem more important than that dreaded activity...backing up your computer!  I would argue that summertime is actually the best time to take on this dreaded task.

From the beginning of my scrapping journey - I have been paranoid about losing my photos. I have been lucky that I haven't actually lost photos but I have come very close a few times... in ways that don’t have anything to do with hardware failures (like external hard drives or desktops) although I have had that happen as well!
We have so many photos that we take everyday - at least I do! For example, on a recent girls weekend I took well over 250 photos. Not that I recommend that you keep all those really bad photos - way too dark or very blurry. But you need to be able to save the ones you want to keep safe and secure so that you can access them to scrap with. I don't know about you - but even though I do keep up pretty well with current "project life" type scrapping, I have lots of older projects and big vacations that still need to be documented.
The best recommendations that I’ve seen are to maintain at least 2-3 copies of every element and that at least one of those copies should be in the cloud. Right now I have photos and supplies on my computer’s hard drive (although almost maxed out on space there), 1 external hard drive (EHD) and several cloud systems – Dropbox, Backblaze, Google Photos and some big trips also backed up on Flickr. Plus, since I have doing digital pages beginning in 2014 – those are all uploaded to Shutterfly and Persnickety Prints – although those are not true backups… Some of these systems are newer to my process and some I have been using for a long time so let me explain about a few of them.
My biggest challenge is keeping this all organized though. In my mind I would love to have everything beautifully organized but that is just not a reality for me at this point in my life. Hopefully one day the organization can occur - but until then I want to be able to find things at least by using the search functions.
My longest used system - and the one I feel most comfortable utilizing is Dropbox.  Dropbox can automatically backup your phone photos and syncs your files across your devices (PCs, iPads, Tablets etc.) - you can selectively sync your files even if you are short on space on one device over another.  I love the ability to share the files or entire folders with anyone in my family of friends.
However a word of warning for sharing - this is where I almost lost all of my trip pictures to Arizona from 2015...thanks to sharing a folder with my mother. You see you have the option to have Editing or Viewing capabilities with whoever you share with - this is true of many other cloud based services as well.  Make sure you don't give folks Viewing options unless they know what they are doing.... I almost lost 350 family photos (plus almost 6-8 hours of editing) when my mom ran out of space in her free Dropbox account! Luckily I caught it on the 30th day - where you can still recover files, and now I pay for the 1 year archive option (instead of the default 30 day option) in addition to the 1 TB of storage.
Another great based cloud system that I have found recently is Google Photos - also available for PC, iOS and MAC products, and Android based products. This tool also allows for easy photo sharing and the creation of separate albums - however since this has the power of Google behind it - you can easily search by person's name or location too!  It has smart logic and algorithms that get smarter the longer and more you use the tool.  I have found pictures of my children at a young age that I didn't even know I had scanned. There is a great free class available at Modern Photo Solutions that teaches you about all the advantages to this tool.
Now I know that I have shared primarily photo and digi supply storage solutions so far (which also work on your phone - either Android, Windows or Apple) I also wanted to share that I use Backblaze for backing up my Desktop at home.  Here I back up all of my files in addition to all of my photos and digital products. There are several products out there that do the same thing - In fact I had previously used Carbonite for this same reason.  But there are a few important reasons why I made the switch.  First of all - Backblaze is a little cheaper - yay for more money for digi supplies!! The time it took to back up my whole computer initially was not too long and most importantly - they offer the option to ship you an external hard drive with your complete backup on it for $149 which is refundable when you return the EHD.  That alone was worth the switch as I have had several computer failures which required me to reinstall EVERYTHING on my computer!
One drawback that I have noticed, at least between Carbonite and Backblaze, is the ability to search your backup and selectively restore files (or use them for digi scrapping in my case).  With Carbonite - I was able to see thumbnails of my backed up files and selectively restore - say those 2011 Disney pictures.  With Backblaze, there are no thumbnails and selectively downloading is much more difficult.  While it was a nice option for Carbonite - overall Backblaze has better options for full restoration.
Finally a note on External Hard Drives - I currently use a 5 TB Seagate EHD (gotta love Costco!) The standard software that is included with the EHD is all that I use.  There may be a better way - but that research is on my to do list this summer. And here is the advantage of having all my photos in one space - I am able to quickly and easily find older pictures - like these of my husband's graduation from his Master's degree from 2005.

I hope this helps you get started with taking this on as your "summer" project. If you have any other questions - please let me know and I'd be happy to help out any way I can.

Thursday, May 25, 2017

School Album - Part 1: Organizing and Photographing Artwork

This blog post was first published at www.amberlabau.com blog. Here at Painted Ladies Journal, you will find a few affiliate links throughout to point you to some of my supplies used in this project. Shopping with these links cost no more than normal prices and sends a little bit my way to support our blog!

School Albums Blog Series: www.paintedladiesjournal.com

I am in the process of setting up a school album for each of my three kids. My oldest is just finishing 2nd Grade and my youngest is in his first year of Preschool. I'm not too far behind yet, but anymore and I will start feeling that way. 


School Albums Blog Series: www.paintedladiesjournal.com

Over time I found the 12x12 binder albums that I wanted. Each child will have two matching binders and all six look nice together while they still live here.

We R Memory Keepers WRRING12-60907 Classic Leather 3 - Ring Album 12 x 12 in. - Orange Soda


I don't want to repeat much, if anything in our annual Project Life albums. It will showcase a lot of artwork, classroom photos, school pictures, school activities and maybe the key extracurriculars they did that year. I plan on coming up with a recipe for what to include each year, including a rough layout template and repeat that from pre-Kindergarten up through high school.


School Albums Blog Series: www.paintedladiesjournal.com


Today's blog post is about organizing the pieces throughout the year, so that when that school year is complete you are ready to put it together. Maybe you are more like me and have a few (or all) years to do. Artwork is a big part of it. I am photographing it so that I can incorporate it into a 12x12 album easily.

School Albums Blog Series: www.paintedladiesjournal.com

When something comes home that I think I might want to include, I add the date somewhere on the back or even the front lower corner, along with a name. I will weed stuff down at the end of the school year, but try to collect the stellar stuff that tells a little about their year.

School Albums Blog Series: www.paintedladiesjournal.com

I keep everything that I can in a filing cabinet. Each kid gets a folder per school year. I file report cards, writing samples, artwork that fits, school pictures, certificates, etc. 
I love my HON filing cabinet. It's deeper for under a desk, but I have it in our closet.
HON 312PP 310 Series 26-1/2-Inch 2-Drawer Full-Suspension Letter File, Black


School Albums Blog Series: www.paintedladiesjournal.com


I put oversized art pieces together near the filing cabinet.
So, it's the end of the year (or anytime if you are playing catch-up). Most everything I will use needs to be digitized. 


School Albums Blog Series: www.paintedladiesjournal.com
One approach is to start with your current year with the most recent memories, and then work backwards. Typically, I would go with that approach, but I was really anxious to free up space in the filing cabinet, so I'm starting with my oldest's first year of Pre-Kindergarten (3-year-old Preschool). I grabbed that hanging file and got to work.
Hanging Files:
Pendaflex Ready-Tab Extra-Capacity Reinforced Hanging Folders with Lift Tab Technology, Legal Size, 6-Tab, 20 per Box, Assorted Colors (42702EE)
Label Maker:
Brother P-touch PTD400AD Label Maker With AC Adapter


School Albums Blog Series: www.paintedladiesjournal.com
I like to use a clean white canvas as a backdrop and lay the piece on top and shoot from above. 

White Canvas:

Find a spot near a window for good natural, indirect light. Mid-morning or afternoon are typically best for me, but you will need to take note when that is in your part of the world. Make sure to hold the camera or your phone parallel above your subject. If you do not have access to good daylight hours and want to get this project done, say after kids are in bed, I suggest investing in a lightbox. Go here for a review I previously did on the Shotbox. There are also plenty of tutorials out there on how to make one.


School Albums Blog Series: www.paintedladiesjournal.com

I have also tried non-daylight photographing with an app called PhotoScan (a free app by Google). It will remove glare for any lighting and align artwork nicely, cropping to just the artwork. I ended up using this app even with my natural light photographing and really liked the ability to rotate and crop right to the edges within the app. It takes a little longer than just snapping a photo, but it will save me time cropping.

School Albums Blog Series: www.paintedladiesjournal.com
Here are two screenshots from my phone within the Photoscan App. Here is the feature that makes it great for photographing artwork. The top image shows the options to rotate on the bottom left and "Adjust Corners" in the bottom center. If you select Adjust Corners, you see what is shown in the bottom image above. Four connected dots appear that you can move around to your liking. 


School Albums Blog Series: www.paintedladiesjournal.com


When you select one corner, a zoomed-in image pops up so you can pick the exact corner if that is best for the image.


School Albums Blog Series: www.paintedladiesjournal.com
You can photoscan and adjust a batch in the app and then "Save All". It will save to your camera roll and Google Photos.

Now we are all set up to start creating a format for getting these school albums done. I'll be back with Part 2 of this series soon! If you want to dive in, I suggest these products from Amber LaBau Designs:


Wednesday, May 17, 2017

Using RadLab and PicTapGo with digital scrapbooking

When I was first started out digiscrapping - one of my biggest challenges was photo editing. Although I was not (and still not) a crazy perfectionist - I really wanted to highlight my memories the best way possible with the best images possible. Up on Amber LaBau's blog today I am highlighting some useful tools for photo editing.

There are so many parts and pieces (at least for me..) about teaching yourself Adobe Photoshop (or Photoshop Elements in my case) that not every aspect could be mastered at the same time!  I already talked about some of my tips and tricks about shadowing in this blog post. After I was able to master the basics and shadow my elements using styles, the next big step was improving my photo editing!  On my phone there are many tools for basic editing and even advanced editing - but I did not have a good handle on how to stream line my process on my PC.
I do use both my iPhone 6S+ (soon to be upgraded... to the amazing iPhone 7+ with its portrait mode) and a Canon 60D (mostly with my  kit lens). I take lots of photos - especially on vacations (even work trips to new cities) so the quality is usually fair to ok to start with but I know that the right editing can really improve the quality!
One of the first tools I heard about is RadLab.  Its developed by Totally Rad which has lots of options for photo editing for PSE, Photoshop and Lightroom.  I like the fact that there are products from the same family as you grow in your skills.  in addition - there is an iPhone option called PicTapGo which has nearly all the same functionality as Rad Lab (and is embedded in Becky Higgins Project Life app!. Unfortunately RadLab abandoned development on an Android version of RadLab.  There are however lots of good options for Android included on this blog post including using Camera+ which also has great editing options.
Just to be clear, I am not getting paid by Totally Rad, this is just based on my great experience using their products for photo editing on both my PC and iPhone. Even better, they offer a 30 day trial so that you can figure out if this product is the right option for you. Even in PSE there are ways to batch process images...with even more options of course in full Photoshop! To be honest one of my to-do items this year is to learn that batch process thing...
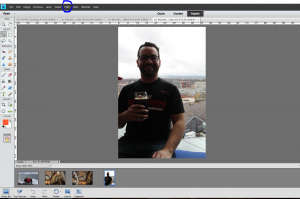
Once you purchase the program (which is not cheap, but is often on sale.. make sure to sign up for their newsletter) you download it to a place you can easily access. It is available for both MAC and PC.  Once you have it installed (instructions on their website are easy to follow) you can access through the filter menu. Here are some pictures from our trip to Ireland  - at the Guinness Storehouse Gravity Bar, the wild western coast and from our pizza making class close to our house.
Once you install RadLab you will find it under the Filter options.  I am using PSE11 but I know the newer versions will still be located in the same location.
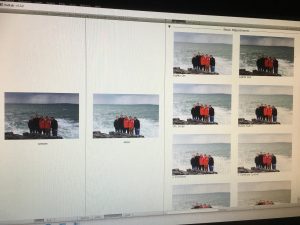
Once you open your image with RadLad - you will get all the style options
You can see all the options for the different styles that RadLab has built into the program. You can layer more than one option onto your photo to get the right adjustments.  And you can keep layering until you are happy with  your results. There are also some fantastic black and white options as well - and so much better than the built in options that are found in PSE.
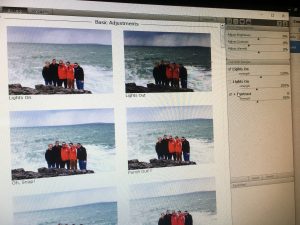
As you can see below, on an even finer level of detail - there are sliders for each filter or adjustment layer you add to your photo along with basic edits for Brightness, Contrast and Warmth.  My example here is a photo taken in some gloomy & darkening sky conditions. You can also save your favorite recipes to simply edit with one tap!  That is a huge time saver especially when you are editing photos from a big event since the conditions will be very similar from that event.
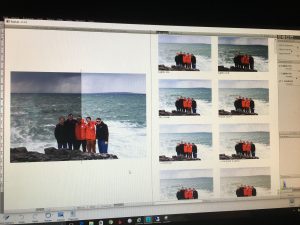
Here is the after with 2 layers of photo edits - and you can view all your progress right on the screen. You can do a split image, or a side by side comparison. There are ways to further tweak the image but I am fairly happy with the results - especially the big improvements from the original photo.
Here is the final comparison with the adjustments - in a split screen. Colors are more vibrant but still very nice contrast and detail.
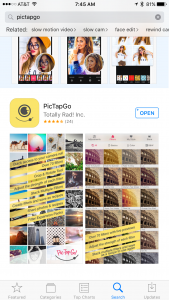
And all the skills you learn from you PC/MAC can be easily transferred to your iPhone by using PicTapGo with all the same functionality. Here it is in the App Store
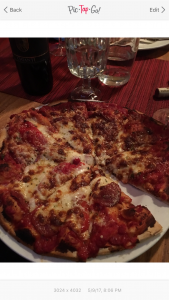
Here is a how a image opens on my iPhone - my husband and I took a cooking class last week on Pizza making  - so of course I took a photo of the final product - yum!! While the pizza was yummy the color was too dark and uninspiring.
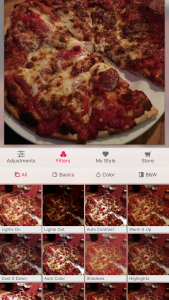
After you select the image you see the numerous filter options - just the same as the PC version with all the color and black & white options.  You don't have the split screen options but you can switch back and forth with the back button easily & the slider is curved right below the picture.  You can also save your "recipe" to use on lots of other photos from the same event or ones you normally take in the same place.
A couple of quick edits and much more appetizing!
Hope this overview on one useful tool that helps make photo editing simpler, Rad Lab (for PC/MAC) and PicTapGo (on the iPhone), which can really make a difference in your work flow. If you have any further questions or need any some more direction/tutorials please let me know and I would be happy to help out!


Thursday, April 27, 2017

Creating & Printing Two 3x4's on a 4x6 for Hybrid Projects

I created this post for the Amber LaBau Blog first, and it can be found here. My version here includes some shopping links at the bottom, sharing apps and products that I like to use for this process I am sharing today. Some are affiliate links.


Holly | www.paintedladiesjournal.com
With "Week in the Life" (by Ali Edwards)  just happening last week, I thought I'd share a few ways that I print for this type of hybrid project. I use a combination of pocket pages and full size 6x8. Therefore, I mainly print 4x6, 6x8 or (2) 3x4's on a 4x6 for this project. I split this post into two parts to share two different ways to create and print (2) 3x4's on a 4x6 at home. I have a Canon Pixma printer, iPhone 7 and Windows 10 Laptop. I think most of this tutorial can be applied to any device, but keep that in mind.

PART ONE: CREATING THE PROJECT LIFE APP

There is something to be said about prepping hybrid pieces on your phone. It can be done little by little, when you have time, ANYWHERE. (If you just don't like working on your phone like this, I suggest www.picmonkey.com  or Photoshop/PSE to do this step) So, let's look at the PL App for setting yourself up to print 2-3x4's on a 4x6. These can be journal cards or photos. I like to print journal cards on matte photo paper or cardstock and photos on semi-glossy or glossy photo paper. For this reason, I always group either 2 journal cards or 2 photos together.

Holly | www.paintedladiesjournal.com

Here's the first screen, when you open the Project Life App. Pick the upper left picture.

Holly | www.paintedladiesjournal.com

Now you see this screen, and you are ready to pick your photos or journal cards. Save what cards (and photos, if they aren't on your phone already) that you want to use to Dropbox ahead of using this app and you will be able to access them.

Holly | www.paintedladiesjournal.com

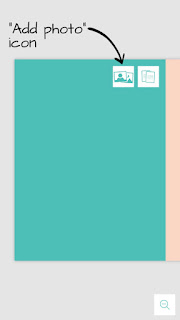
Whether you are wanting to print cards or photos, when you are accessing from Dropbox, you will select the "add photo" icon.
Holly | www.paintedladiesjournal.com

On this screen, scroll down toward the bottom to find the Dropbox option. Then, find your cards and photos you saved. If you want to add typed journaling before printing, you will not be able to in Project Life because it thinks you brought in a photo. But, you could bring it into another app like LetterGlow or Over (Luly talked about this in her post on App Scrapping).

Holly | www.paintedladiesjournal.com
So, I've brought in two photos for my WITL project that I want to print as 3x4 photos. One with journaling that I typed in the app, Letterglow, before bringing in here. Select the bottom right icon and then select "Export".


Holly | www.paintedladiesjournal.com

You can export it to a number of places. If you are printing from your phone, just save it to your camera roll by selecting "export" and then "Save Image", shown above. If you are printing from your computer, you can save back to Dropbox OR "Save Image" and import from your phone's camera roll.

Now, you are ready to print! I like to buy the canon 4x6 papers for printing at home on my Canon printer. Go here to see links to products I use. I prefer to print from my laptop because I have more control, but have printed plenty from my phone! I did a more detailed post on printing from your phone here.

PART TWO: CREATING & PRINTING WITH THE CANON PHOTO SOFTWARE

I use a Canon Printer and have the Canon - Easy Photo Print EX software installed on my laptop. I really like that I can create 2 3x4's on a 4x6 right in the software. One less step! It is great for photo printing. The following is a quick peek at how it works. I like to use the Letterglow or Phonto App to write on top of any photos that will get journaling before printing. One tip: keep track of what scale or size your font is, so that you can be consistent throughout the project.
Holly | www.paintedladiesjournal.com

Upon opening the software, you will see this screen. Select "Photo Print"

Holly | www.paintedladiesjournal.com
There is a panel of buttons on the left-hand side that you basically go through one at a time in order. Hit the "Select Images" button as shown above, then find the photos on your computer. Pick two photos, or any multiple of two if you are printing several at once.
Holly | www.paintedladiesjournal.com

Next, hit the "Select Paper" button on the left side. Select the 4x6 and correct type of paper (I suggest glossy for photos and matte for journal cards).
Holly | www.paintedladiesjournal.com
Here's the neat part. You select the option for "x2", or 2 photos on one page. You can rotate each panel, if needed. You can select borderless or with borders. I like borders!

Holly | www.paintedladiesjournal.com

One last thing to check. Under Preferences, you want to check that the "Amount of Extension" is set to NONE.

Holly | www.paintedladiesjournal.com

Here's a few of my prints. I'm using some of Amber LaBau's "Project 52 2016 Edition" in the Project Life App. They are kinda PERFECT for this project. Day of the week cards! When creating images from different platforms (for instance, I'm using both the PL App and Letterglow), do a couple of test prints of images to compare font size before going crazy and creating all your images for your project!

If you are not using photo printing software, the best tip I can give for printing at home when you want to print (2) 3x4's (this also applies if you want white borders) is to make sure you have selected Borderless Printing and then you want zero extension. Most printer have something called "amount of extension". On Canon, it's under Page Setup and it's a slider bar I pull all the way to the left. Otherwise, it will zoom in and cut off a little bit of photo. This is the default setting. Make sure your 4x6 paper is lined up in the machine well and print!

Thanks for joining me today!
Holly Genc

Products I like for this hybrid project:


LetterGlow - Graphic Design & Photo Editing - The Lens Lab Pty Ltd


PicTapGo - Totally Rad! Inc.


Phonto - Text on Photos - youthhr