Sunday, November 6, 2016

How to Add QR codes to Project Life pages


We live in such a multi-media world - videos, music and photo montages are everywhere - and I think they can really enhance our Project Life pages.  Imagine being able to add the video of your child's Christmas pagent performance right along with the photos.  We have been having too much fun here in Chicago with the Cubs winning the World Series.  So along with all the great images that are available on the interwebs I also wanted to add some of the exciting game highlights videos and as well the music that has become a hall mark of this season.  The one that struck me first was a "music" video done by  Eddie Vedder and posted on the official Chicago Cubs site as a thank you to the fans... I know that I will be completing several more pages with the additional QR codes since there are a lot of moments that I want to capture for my grandchildren and the generations after that (..who knows how technology will change but they will have a work around too!)


First thing you need to do is to find the best link - I suggest a YouTube link since that is the largest platform and most tech stable - i.e. is not likely to go away anytime soon! I copy the link from the search bar


After you have the link you open up a QR code generator.  There are several free sites available to do this easily.  I have used both QR Stuff and QR Code Generator.  In this example I am using QR Code Generator.  There are many QR code Generators in the iTunes App store and the Google Play store as well so it doesn't matter what kind of hardware you are using.

Paste the address from the YouTube video in the generator box and then hit the Generate QR Code button. The website does the rest for you.  The QR code generator does the rest and you can download. 


 You can do the same on your phone - that is the great thing about these QR codes - they can be generated right in the palm of your hand. I will show you that next. Using your phone there are a couple of easy steps that are similar.

You find the YouTube video that you want to generate the QR code for. There is an arrow button at the top that will bring up a screen where you can copy the link.


Next you can you go the QR code generator app and paste the address where is says URL and hit done:


Finally the QR code appears and you can hit the share button on the top right corner and then you can save the image to your camera roll.


There are lots of programs that will allow you add images to your photos or even completed Project Life app pages. I really enjoy using Photo - a free program although there are others that can do this as well.  In this program you can even upload you own fonts ( I even uploaded my own handwriting font) to add more text or larger titles. It also allows you to layer on a QR code.  


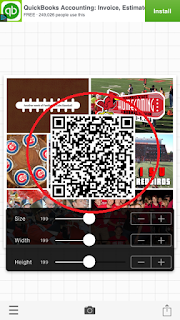
Use the Add Image button to select your QR code


Finally - size and place the image where it works on your layout or photo.

Here is 1 more example where I added a QR code to document the Marching Band parade..


Hope you enjoyed this tutorial!


Monday, October 31, 2016

Halloween Hybrid Mini-Book

HAPPY HALLOWEEN!! I made this fun little hybrid mini-book using Amber LaBau's Thirty-One collection (collaboration with Sara Gleason), earlier this week. I'm so excited to share with you how easy this is for anyone to do.

Halloween Hybrid Mini-Book using "Thirty-One" by Amber LaBau Designs & Sara Gleason. Created by Holly www.paintedladiesjournal.com
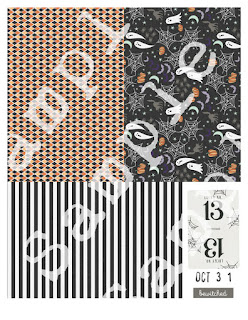
I chose to make mine a 4x6 book. The first thing I did was pick out which Thirty-One papers that I wanted to use. Then, I cropped them to 4x6, so the patterns would be the right scale. 

"Thirty-One" by Amber LaBau Designs & Sara Gleason

I laid them out on an 8.5" x 11 canvas in Photoshop Elements (my software of choice). I added some of the word strips and other elements that would be easy to cut out by hand to the extra room left over. 

Halloween Hybrid Mini-Book using "Thirty-One" by Amber LaBau Designs & Sara Gleason. Created by Holly www.paintedladiesjournal.com

I glued my 4x6 papers back to back to make the pages. One tip: First create your layout and then glue them together, being careful nothing is upside down as you flip pages. This way, if you want to use your tiny attacher, your staples are hidden on the inside. 

Halloween Hybrid Mini-Book using "Thirty-One" by Amber LaBau Designs & Sara Gleason. Created by Holly www.paintedladiesjournal.com

I used my Canon Pixma and Silhouette to print-n-cut most of the elements I used on these pages.  I like to use the PicStitch App to create 4x6 photo collages with white borders to cut down for these smaller pages.

Halloween Hybrid Mini-Book using "Thirty-One" by Amber LaBau Designs & Sara Gleason. Created by Holly www.paintedladiesjournal.com

Once I had all the pieces, this album went together very quickly. And it was so fun to do! The pages go together easily when you have a coordinated kit like this. That little black cat card (love!!) is from the Thirty-One Cards, which I scaled down a little to fit better on my 4x6 album.

Halloween Hybrid Mini-Book using "Thirty-One" by Amber LaBau Designs & Sara Gleason. Created by Holly www.paintedladiesjournal.com

I added some black stickles on top of the BOO letters to give it a little more sparkle. The ghosts were from the Thirty-One Elements & Paper Pack. These are my favorite! I put a bunch on an 8.5"x11" canvas in PSE (Photoshop Elements), flipping some so they would be flowing in both directions. Then, I printed them on vellum. I hand cut these. The Silhouette can cut vellum, but I believe you need special vellum made by Silhouette.

Halloween Hybrid Mini-Book using "Thirty-One" by Amber LaBau Designs & Sara Gleason. Created by Holly www.paintedladiesjournal.com

Last page! I plan to add a few pages from past and present to show the different costumes over the years. Hope everyone has a fun and safe Halloween!

Holly Genc www.paintedladiesjournal.com
Instagram | Facebook | Pinterest

I've listed a few affiliate links to supplies I like to use below:

My favorite apps for editing photos and creating 3x4 collages:

PICTAPGO for editing. The lighten is awesome on any photo.
PicTapGo - Totally Rad! Inc.

PICSTITCH (paid version is needed to create thicker white borders - so worth it) for collages.
Pic Stitch - #1 Photo and Video Collage Maker - Big Blue Clip, LLC


  CANON MG7520 Wireless Color Cloud Printer with Scanner and Copier, White (Discontinued By Manufacturer)


  Canon Photo Paper Plus Glossy II, 4 x 6 Inches, 400 Sheets (2311B031)


Canon Photo Paper Matte, 8.5 x 11 (50 sheets) - I used this to print my papers and elements on the Pixma Printer listed above. I love the quality!


Tim Holtz Tiny Attacher


Black & White Grosgrain Ribbon (so versatile!)


Metal Book Rings for binding your mini-books. These are 2".

Towbow Permanent Tape Runners - These are the ones I use. Be sure to use permanent tape in a book like this. Also, you need to apply liberally along each edge.


Wednesday, October 19, 2016

How I use the Project Life App to Plan and Keep Up in my Physical Albums

Are you a physical Project Lifer? I know, I like holding and creating physical layouts. It gives me joy. Think you have no need for the Project Life app? Think again. I'm going to share with you how I use it to aide in my physical pocket page layouts.

Project Life App for planning physical pages - Holly www.paintedladiesjournal.com


It's not just about pre-planning my pages. It's also a way for me to get some journaling done while it is still fresh in my mind. I love capturing the details that I know I won't remember later. 

I'm not going to go into how to create layouts, there are lots of good ones out there. Becky Higgins has done it here.  I'm going to show you how I organize and set myself up to print the photos. I will note that I don't worry too much about which journaling cards I am using in my app layouts because I usually use something different later, BUT sometimes it's so perfect I just print the journal cards, too.

Project Life App for planning physical pages - Holly www.paintedladiesjournal.com


So after you have created your page, you can save it by the date the photos were taken. Click on the "More Options" under "Completed Pages".

Project Life App for planning physical pages - Holly www.paintedladiesjournal.com


From here, you will click on the page you want to update and select "Update Page Info"

Project Life App for planning physical pages - Holly www.paintedladiesjournal.com


Correct the date to match the layout photo date. There is a spot for a "name", too. I usually put in here a code "PPx", meaning that I have uploaded the photos to Persnickety Prints for this layout.

Project Life App for planning physical pages - Holly www.paintedladiesjournal.com

You want to either export these and save them by date in a Dropbox folder (I do this so I can flip through them easily in order and see what type of pocket page I need next, if it's not the typical Design A.) or leave them all in the PL app. Then, you can go back and refer to the layout configuration and the journaling when you sit down to scrap.
Project Life App for planning physical pages - Holly www.paintedladiesjournal.com

I have a folder in Dropbox called "Project Life" where I save them by year-month day format so they save in chronological order.

Project Life App for planning physical pages - Holly www.paintedladiesjournal.com

Next up, order those photos, if you are batch ordering from a service like Persnickety Prints. And when they arrive, do the happy dance and start filling in your pocket pages!! I just love white borders!

Project Life App for planning physical pages - Holly www.paintedladiesjournal.com

Now, I like to skip around and do which ever page goes with what products I'm excited to work with. Eventually, it'll all be done and in chronological order. Look at all those pages layed out and ready to be scrapped. The best part!

What is your process for getting photos in your albums? I know this may seems unusual but my process has totally evolved for the better (for me) over the last year. It's working and I love it. I'd love to hear your ideas for getting your photos printed!

And if you want more ideas for using the Project Life App as a physical scrapper, Becky Higgins wrote a great article showing lots of other great uses the apps specifically for this. Find it here.

Go here to purchase this app (this is an affiliate link, thanks! Affiliate links send a few pennies my way and do not cost the purchasers anything extra)

PROJECT LIFE APP iOS
Project Life - Becky Higgins LLC

This is my favorite editing app - the brighten action is worth the whole app.
PicTapGo - Totally Rad! Inc.

Thursday, October 13, 2016

Project Life - A Day at the Theme Park (Part 2)

Project Life Pages by Holly Genc www.paintedladiesjournal.com
I'm back with Part 2 of our day at Great America. It was a full day, packed with lots of great photo opportunities. I'm not a weekly scrapper, so the occasional multi-page spread works out for me. Go here to see the first part of this blog series.

Project Life Pages by Holly Genc www.paintedladiesjournal.com


These pages use a combination of the last of my Take 10 Kits and some MAMBI cards from my stash.
Project Life Pages by Holly Genc www.paintedladiesjournal.com


In Part One of this series, I talked about how I printed my journaling with the Selphy. If you'd like to know how I created my journaling to print on the Selphy, I have a tutorial right here.


Project Life Pages by Holly Genc www.paintedladiesjournal.com

Hope you enjoyed this series of Theme Park Layouts!


Holly with www.paintedladiesjournal.com
Follow me on Facebook and Instagram! Below you will find a few affiliate links of my favorite supplies. Affiliate links kick back a small amount of money to the blog, and cost the buyer nothing extra. Thanks for your support!


My favorite apps for editing photos and creating 3x4 collages:

PICTAPGO for editing. The lighten is awesome on any photo.
PicTapGo - Totally Rad! Inc.


PICSTITCH (paid version is needed to create thicker white borders - so worth it) for collages.
Pic Stitch - #1 Photo and Video Collage Maker - Big Blue Clip, LLC


  CANON MG7520 Wireless Color Cloud Printer with Scanner and Copier, White (Discontinued By Manufacturer)


  Canon Photo Paper Plus Glossy II, 4 x 6 Inches, 400 Sheets (2311B031)

Canon Selphy 1200 printer