Monday, April 17, 2017

How to load and use Styles in PSE

When I started digital scrapping - there were so many things I needed to learn. I was so excited to get started that I didn’t necessarily learn too much before I started on my first few pages. Of course, I had been a paper scrapper for many years and I had been collecting freebies and some basic supplies for a few months before I started. Of course, being the organized person that I am (or at least hope to be..) I wanted to start my digital pages starting in January 2014. Over at Amber LaBau's blog today I am sharing some of my insights in how I was able to improve my scrapping skills by using Styles.
I have been working consistently on Project Life since 2012. As much I love the physical products – I loved the ease of being able to scrapbook on the go because I spend a lot of time commuting/traveling because of work and family commitments. I certainly am able to be much more prolific as a digital scrapper as well (for example I was able to print my second half of 2016 at the end of January).
As a point of reference I am using Photoshop Elements 11. I keep thinking about moving to full Photoshop but I need to better understand how this works offline (since I mostly work offline). The directions will be very similar in full Photoshop.
For me having the photos and kits in “one space” has been life changing in terms of design flexibility – but that of course was only the first step in the design process… There are so many options and tweaks that are possible in digital. I feel like I am still learning something new everyday – I love watching live scraps and working on challenges. There are many challenges available at The Lilypad and you get discount coupons, too! Anything that grows and stretches my design skills is useful – always want to be learning!
One of the first challenges that I had in digital scrapping was learning how to do shadows. Not that I feel like I am an expert yet, but I certainly have come a long way. I look at some of my original layouts and the shadows are super harsh or too large! Here is an example… (please be kind)
A very early digi page, not using styles (kit from Penny Springmann, retired)
From watching some live scraps at Scrap Orchard (which is now closed) I learned about shadow styles – wow!!!! What a difference – plus it provides the consistency that I really, really love... and it also taught me how much how I could learn about digi scrapping.
I love the styles at The Lilypad - the most important and most basic ones are the shadow styles.  Amber has a great set called My Shadow Box
After you purchase and download and unzip, In the Expert panel in PSE- go to the Fx tab on the bottom right.
On the top right of the screen with the 4 lines and the down arrow is where you load styles
Just have your styles (.ASL files) someplace easy to find.  I try to keep them in the same folder in case you need to reinstall (like I am currently in the process of doing :-(...
Now you are all set to start using your new style!
Let me give you an example of the difference that adding styles can make on your page.
Here are the some of Amber's Elements from one of her recent kits - Cake Smash. You will see that these are very cute even without the shadows - but they look much more realistic using the shadows.  Just select the layer the elements is on - and double click the "style" that you want - just hover over the different square and a description will pop up. Literally just 1 click!  You can also select several layers at a time and apply the same style to multiples.
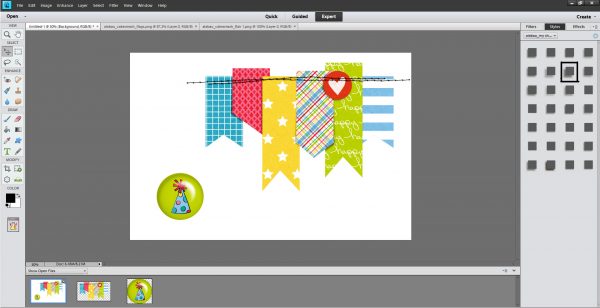
Before
After
In fact here is a recent layout that give you idea how it can all come together
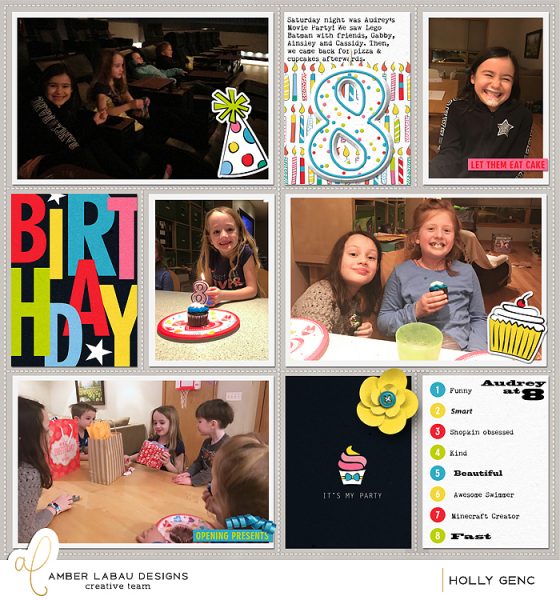
Using Cake Smash by CT Holly
Notice the candle and the flower and how they look like they are popping off the page? Realistic and consistent shadows.  That is what styles can help you achieve easily.  And there are so many options - just take a look around some of your favorite digi stores - The Lilypad is stocked with lots of options.  Many times you need to combine various sets to get the look you really want!
Hope that this have given you a beginning primer on how to install and use styles to get your digi scrapping to the next level! If you have any questions - don't hesitate to reach out - we have lots of experts on our team and many suggestions to help you advance your skills when  you are ready.

Monday, March 27, 2017

Beyond the basics for App Scrapping


On Amber LaBau's blog today I give a few beyond the basics tips for scrapbooking on the go. For as much as I love digi scrapping - sometimes life gets in the way and I do not get all the time I want in front of my computer screen. However I always have my cellphone with me and I find that I can get a lot prepped and finish up layouts when I do actually have time to get in front of my PC. First and foremost - the best way I have found to be able to transfer and use photos between devices is to use Dropbox. Dropbox is a cloud based document storage platform - and you can sync between multiple devices automatically.  

I also use as 1 of my cloud storage systems for my phone photos - its automatic and reliable. Photos are copied to a folder on my PC and then I can organize from there. I do pay for extended time for my deleted photos (1 year versus 1 month - and yes I have had to use it!) as well as extra storage since I save all of my current kits in Dropbox for ease of use. I currently have 1TB of storage. Dropbox is available on iOS and Android.


The next most important tool in my arsenal is Becky Higgins Project Life app. This app is also available on iOS and Android.  Although there are other similar programs ( Rhonna Designs and many collage apps which are also excellent..) - the ease of using of this app has changed my on the go scrapping in so many ways! Introduced in fall of 2014 there have been many improvements over the last 2.5 years.  Many weeks I only take pictures on my phone so having the app is an excellent way of keeping up with documenting my year.  There are many kits built into the app - but even better is that by using Dropbox you can use cards from any kit - especially adorable ones like Amber's! There are lots of tutorials on Becky's website and YouTube that can help you get started if you are not familiar with the app. There are many different templates available  - you can even use very large photos.
You can export to print individual pages or into photobooks.
The next tool in my arsenal of beyond basic apps is Pic-Tap-Go.  There are many great basic photo editing apps built in all phones (and they get better with every version) but I like have the ability to have multiple layers of editing available.  Although this is only available in iOS - a very comparable product for Android users is Snapseed. There are many, many photo editing options available but I have found these to both be very consistent - and they also leave your original uneditted version in your camera roll in case you want to use it in a different way - for example using a color version and black & white version of the same photo on separate layouts - or even the same layout.
One of the only drawbacks if you want to add some artisitic touches is that you cannot add all the extra embellishments in Project Life etc.  That is where Over comes in.  It allows you to add text over your images, add png's - even mat your layout with a piece of patterned paper. Over is developed in part by Adobe (the makers of Photoshop an Photoshop Elements) so they understand the digi scrappers workflow better than most.
In this app you can upload fonts, add .png's and word art that is built into the app. You can also add dropshadows (and control what they look like) on elements that you import in the app.
Over is available for iOS and Android.
Now for the fun part - let me share some examples of beyond the basics in app scrapping.
First step is selecting which photos I wanted to use and what kit to use – everyone has their own method for selecting kits to go with their photos.  I tend to use colors or themes as my primary selection method – some people use a kit for a month or year so it all depends…
In this case I am happily scrapping my photos from my Ireland trip!  I just got back last week so all the memories are fresh and I am excited to be documenting them quickly!  That is the best part of using apps – is that you can even scrap on the go – in the car/bus/plane etc. while the memories are still so vivid!
I use the Becky Higgins Project Life app and select a basic template that I wanted to use – don’t worry you can change it as go – which in this case I did.  I knew I wanted to work with my photos from Trinity College and the library where the Book of Kells is located – it was amazing! I looked around to see which kit I wanted to use.  I ended up selecting Amber’s Composition Pocket Squares and some of the elements from the Memory Pockets Monthly: Composition kit from September 2016.  I was a long time subscriber – and while I was looking at all the great elements/papers etc. from the kits I may have to subscribe again…
    
In the app, you pick a pocket and insert either a photo or a card.  In the case of using a kit outside of the app, you will insert as a photo. There are lots of options in which file to select your photo from –not only your Camera Roll or Dropbox – but from several other apps including PicScanner, PicStitch, Pic-Tap-Go and lots of social media platforms – and it seems like new ones get added all the time. Then start adding different cards and photos and see what works for your page design.. In this case I went through a few different layouts until I liked where I was.
Within the app you can also edit photos – in case you hadn’t already edited the photos. There are basic edits as well as access to full Pic-Tap-Go editing tools. Now that my photos and cards are where I want  - I can add the other embellishments.

Completed within the app - ready for printing as is, or for additional embellishments
After you are done – you have many options to export your “completed” albums. Since I wanted to add extra embellishments I imported it to Over.
In Over I was able to add embellishments – move and resize and also add shadows! There are even options to do limited recoloring within the app. You can also add text to your photos, recolor, move and shadow. Again there is an option to add your own fonts.  This is a way to add journaling  on your cards that are not native to the app.  It is not a perfect solution, so if I have a lot of journaling I want to do – I usually import into Photoshop Elements (I’m in PSE11) which allows for the most control over journaling size and spacing. However being to get 95% or 98% of my layout done on the go is worth the extra few minutes it might take on a few layouts…

Added text and elements with shadows
Saved back to Dropbox for printing!

There you have it – from start to finish using some of the beyond the basic apps.  I hope you enjoyed this tutorial – please let me know if you have any specific questions or want me to go more in depth on one aspect.


Friday, March 24, 2017

Getting an Entire Previous Year Scrapbooked (Digi)

Storyteller Subscription, 6.99 per month
So, back in 2010, I had a one-year-old, I was working and trying to balance being a mom. I did not get one page scrapbooked from that year, but I did take lots of cute photos. This year I am new to the Just Jaimee Creative Team, but I'm not new to her amazing design work. If you don't know StoryTeller, you need to check it out.


Another great thing that she creates are Ready-To-Go Pages, and they are exactly what you think they are. They come out every week, in time for you to keep up with your Project Life style pages and they are glorious. They are editable, too. By that, I mean you can move things around, or delete pieces that don't quite fit with your photos. Or, leave it exactly as it is and be done super quick.


So, you guessed it, I decided to use the Ready-To-Go 2017 design to go back to my archives and document our lives at my daughter's second year. I found that the first layout required the most photoshop work to change the title year to 2010 and a few other spots where the year needed changing. If you subscribe to Storyteller, you will get all the pieces you need to make adjustments with alphas and elements. The large black 2010 was just recreated with a similar font.


Here is week 6, when we went on a family trip to a vacation rental home that fit our gigantic family. It feels so great to be documenting 2010!


And this is incredible! Right now there is a retirement sale going on at The LilyPad, which ends on March 26, just a few days away. You can get the entire Ready-To-Go Weekly Templates from 2015 for a great deal. Don't let the year 2015 hold you back. I changed 2017 templates very easily to go with 2010. Even the weekly cards! Stay tuned for another blog post with a lot more detail on that. 

Happy Memory Keeping!
Holly Genc


Thursday, March 23, 2017

The Slow Switch - From Physical to Digital Scrapbooking

This post is also found over on Amber LaBau Design's Blog, here. This post contains shopping links at the end!

Holly Genc | www.paintedladiesjournal.com

The Slow Switch.... It has been a process for me and I'd like to share it. Maybe someone will offer up some advice to me. Maybe someone will find something useful for their own journey. Either way, I welcome any new ideas!
It's SO exciting when Persnickety Prints shows up at your door!
First, let me tell you my process as a physical scrapper. I'm on a few Creative Teams (lucky girl), so that does probably lend itself to a different process. I used to CT for a physical Pocket kit club, called Take 10 Kits. I had transitioned to solely doing pocket style physical scrapping back in 2012. I would get a kit and go through photos from any time period that hadn't been previous scrapped and that I felt went with the kit. Many times, I'd be working on the previous year, same month since monthly kits tend to best suit the month they were designed for (go figure). So, basically, I would skip around all over the place, creating layouts. (I still do this with digital!) That said, I still put them in my books in chronological order. It has always worked well for me. I currently put tabs in my older books that still have gaps I want to fill.
Look at that healthy stack! My first order was 50 prints.
So, I could have made a clean break, when I decided to go to digital. I could have finished up all the gaps in my albums, continuing to do physical layouts for those years. Then, my digital layouts could have started at a certain date, going forward. But, since I used binders, I will just be printing 12x12 layouts for my older albums, as I fill them in (Persnickety Prints!) and then slip them into my binders.

There is my Cozy Layout, using COZY CARDS, COZY FULL KIT by Amber LaBau
I will have to be mindful of pocket pages matching up with fronts and backs of digital pages, but I think I can make it work. I saw a post by Amy Tangerine where she just stapled the two different page protectors together to eliminate that problem. I wouldn't want to do that too much, but here and there to solve a problem would work!
My most current physical scrapbooks.
These aren't all my scrapbook binders, but they are the ones I'm most often referring to at the moment. I keep them on our main level in my craft storage shelving, for easy access. I bought a new Project Life Binder for each year starting in 2012. These are for 2014, 2015 and two for 2016. The smaller 6x8 on the end is a personal scrapbook about myself.

It's hard to see, but Amy Tangerine made that "Happy Birthday Holly" sign for me. Reset Girl is in there, too!
It was exciting when my first 12x12 print order from Persnickety Prints arrived, but it was even better finding all the spots to put my new pages into the book. I grabbed a box of 12x12 page protectors and got to work in each album.

There is a Little Moments Layout, using Little Moments cards and Elements by Amber LaBau Designs
When you work this way (skipping all over the place), these monthly tabbed dividers come in very handy! There were several sets that were sold to match the different Project Life Kits. They also sell plain tabbed dividers that you can label yourself.

These photobooks belong to my friend, Luly Gonzalez.
Then, starting with 2017, I will start printing photobooks. My plan is to print two volumes per year. Above is Luly Gonzalez' photobook collection. She prints 10x10 and loves it. I haven't decided whether to go with 10x10 or 12x12. What would you print?
Luly's books take up much less room on the shelf!
I've already started uploading layouts to a book in Shutterfly. It's a good back-up plan for your layouts, plus it is way easier to do them a few at a time, rather than compiling an entire book at once. I do the same with Persnickety Prints. I upload a few at a time to the same folder and when I have enough, then I'll order. Again, a good way to back-up your files.

And there you have it. Did you make a switch from physical to digital? Was it slow or quick? Did you always do digital? I just love that I'm getting our memories in books!

Holly Genc

Want to know where you can get some of the items I've shared in this post? The following are some recommended affiliate links.


Becky Higgins - Project Life - Scrapbook Dividers and Label Stickers - 15 Pack
 (Scrapbook.com)


Universal 12 x 12 Page Protectors for 3-ring Albums - 50 Pack
 (Scrapbook.com)


Becky Higgins 12x12, 60 pack (Amazon), click on image
       
Here are a few of the 12" Dividers from Becky Higgins (Amazon), click on images

  
Here are the 4 - 12x12 binders on my shelf! All available still on Amazon. Click each image.


And here is the 6x8 binder, also on my shelf. (Amazon)

Monday, February 27, 2017

Photo Scanning App Review

I am up on Amber LaBau's Blog today to discuss So I have recently posted a few layouts with older scanned photos – back in the day when digital wasn’t even imagined.  I am fortunate that I do have lots of amazing family photos and I have become the defacto family historian. This makes me happy because I love old photos – but I definitely do not love flatbed scanners! I know that they are best for the most fragile photos – but I don’t have the luxury of always using one when I am visiting extended family.  I have been using one app on my iPhone – PicScanner but I wanted to see if there was something better out there that I wasn’t using.  I have a giant stack from my Aunt’s house and I wanted to make sure I was using the best tool.
First, just using my standard camera on my iPhone 6S + here are a few photos that I will be testing with 3 apps that I choose -  PicScanner, Google PhotoScan and Photomyne. I learned a lot about each one - and its pluses and minuses.  These are iPhone apps except for Google Photo Scan but there are similar ones available in the Google Play Store.
As you can see the photos are in decent shape, but the paper scrapbook is in terrible condition.
So the first one I looked at was PicScanner.  It is the one I have used before - but it definitely has some features which are good and some not so good.
One nice feature is that it won't take a photo until you get a nicely squared photo, i.e. not too much distortion as your taking the photos.  It takes a few seconds to get the image in focus but it can give you a balanced image. One drawback of PicScanner is that it wants to "crop" your image for you - and sometimes the crops are really weird! There is a way to save the full size image, however saving the image without automatic cropping takes several steps.  They could definitely improve that function.
But one super nice feature is the options for saving and sharing. You can even share directly to Facebook. The latest version also allows for automatic iCloud storage which older versions did not.

Next I tried the Google Photo Scan app.  It was very easy to start to use the app - there is a quick tutorial to get started. It uses a unique tool to reduce the glare on scanned photos.  You center the phone over the image and then move to each of the four corners (the white circles). Then the google app overlays the 4 images to remove the glare.

This is how the final version looks on your phone.  Not too many options here - basic cropping and two saving options - Camera Roll or Google Photos.  Again there is some automatic cropping that occurs in the app, but the results are good.

Finally, I tried Photomyne.  I don't know about you but I have seen this one advertised "everywhere"! The advantage of this app is that it allows for quick photo taking and scanning. There is a Pro version available which allows for unlimited cloud storage of your scans.


I took these with just a few clicks - no need to adjust the alignment or to take multiple images of the same photos. In fact I took these 5 in less time that it took me to do the 1 example above. The app does also do some automatic cropping and color adjustments without the ability to reduce or eliminate those changes (at least in the free version...).
I was fairly happy with the results of all three trials. Each app does a good job of scanning with their own pluses and minuses for cropping and storage.I hope that you take my results and pick the best option for you. As I said, I am blessed to have lots of family photos - the ones I used for my test are from my Aunt's 14th birthday (my mother in the center dancing is only 12 years old, and these photos were taken in Cuba). Whatever app you chose, or if you continue to use a flatbed scanner,  find any and all treasured photos that you are lucky enough to have  and make sure that you do take the time to scan them so that they can be enjoyed by future generations.
Happy scrapping!