Thursday, March 23, 2017

The Slow Switch - From Physical to Digital Scrapbooking

This post is also found over on Amber LaBau Design's Blog, here. This post contains shopping links at the end!

Holly Genc | www.paintedladiesjournal.com

The Slow Switch.... It has been a process for me and I'd like to share it. Maybe someone will offer up some advice to me. Maybe someone will find something useful for their own journey. Either way, I welcome any new ideas!
It's SO exciting when Persnickety Prints shows up at your door!
First, let me tell you my process as a physical scrapper. I'm on a few Creative Teams (lucky girl), so that does probably lend itself to a different process. I used to CT for a physical Pocket kit club, called Take 10 Kits. I had transitioned to solely doing pocket style physical scrapping back in 2012. I would get a kit and go through photos from any time period that hadn't been previous scrapped and that I felt went with the kit. Many times, I'd be working on the previous year, same month since monthly kits tend to best suit the month they were designed for (go figure). So, basically, I would skip around all over the place, creating layouts. (I still do this with digital!) That said, I still put them in my books in chronological order. It has always worked well for me. I currently put tabs in my older books that still have gaps I want to fill.
Look at that healthy stack! My first order was 50 prints.
So, I could have made a clean break, when I decided to go to digital. I could have finished up all the gaps in my albums, continuing to do physical layouts for those years. Then, my digital layouts could have started at a certain date, going forward. But, since I used binders, I will just be printing 12x12 layouts for my older albums, as I fill them in (Persnickety Prints!) and then slip them into my binders.

There is my Cozy Layout, using COZY CARDS, COZY FULL KIT by Amber LaBau
I will have to be mindful of pocket pages matching up with fronts and backs of digital pages, but I think I can make it work. I saw a post by Amy Tangerine where she just stapled the two different page protectors together to eliminate that problem. I wouldn't want to do that too much, but here and there to solve a problem would work!
My most current physical scrapbooks.
These aren't all my scrapbook binders, but they are the ones I'm most often referring to at the moment. I keep them on our main level in my craft storage shelving, for easy access. I bought a new Project Life Binder for each year starting in 2012. These are for 2014, 2015 and two for 2016. The smaller 6x8 on the end is a personal scrapbook about myself.

It's hard to see, but Amy Tangerine made that "Happy Birthday Holly" sign for me. Reset Girl is in there, too!
It was exciting when my first 12x12 print order from Persnickety Prints arrived, but it was even better finding all the spots to put my new pages into the book. I grabbed a box of 12x12 page protectors and got to work in each album.

There is a Little Moments Layout, using Little Moments cards and Elements by Amber LaBau Designs
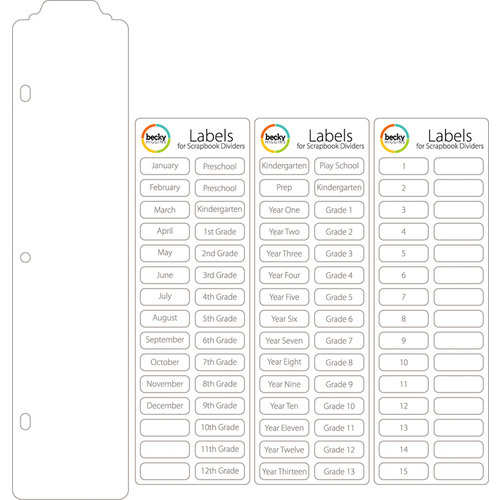
When you work this way (skipping all over the place), these monthly tabbed dividers come in very handy! There were several sets that were sold to match the different Project Life Kits. They also sell plain tabbed dividers that you can label yourself.

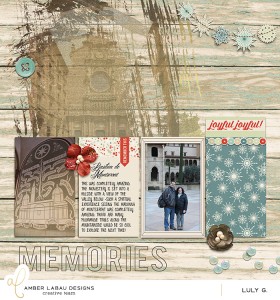
These photobooks belong to my friend, Luly Gonzalez.
Then, starting with 2017, I will start printing photobooks. My plan is to print two volumes per year. Above is Luly Gonzalez' photobook collection. She prints 10x10 and loves it. I haven't decided whether to go with 10x10 or 12x12. What would you print?
Luly's books take up much less room on the shelf!
I've already started uploading layouts to a book in Shutterfly. It's a good back-up plan for your layouts, plus it is way easier to do them a few at a time, rather than compiling an entire book at once. I do the same with Persnickety Prints. I upload a few at a time to the same folder and when I have enough, then I'll order. Again, a good way to back-up your files.

And there you have it. Did you make a switch from physical to digital? Was it slow or quick? Did you always do digital? I just love that I'm getting our memories in books!

Holly Genc

Want to know where you can get some of the items I've shared in this post? The following are some recommended affiliate links.


Becky Higgins - Project Life - Scrapbook Dividers and Label Stickers - 15 Pack
 (Scrapbook.com)


Universal 12 x 12 Page Protectors for 3-ring Albums - 50 Pack
 (Scrapbook.com)


Becky Higgins 12x12, 60 pack (Amazon), click on image
       
Here are a few of the 12" Dividers from Becky Higgins (Amazon), click on images

  
Here are the 4 - 12x12 binders on my shelf! All available still on Amazon. Click each image.


And here is the 6x8 binder, also on my shelf. (Amazon)

Monday, February 27, 2017

Photo Scanning App Review

I am up on Amber LaBau's Blog today to discuss So I have recently posted a few layouts with older scanned photos – back in the day when digital wasn’t even imagined.  I am fortunate that I do have lots of amazing family photos and I have become the defacto family historian. This makes me happy because I love old photos – but I definitely do not love flatbed scanners! I know that they are best for the most fragile photos – but I don’t have the luxury of always using one when I am visiting extended family.  I have been using one app on my iPhone – PicScanner but I wanted to see if there was something better out there that I wasn’t using.  I have a giant stack from my Aunt’s house and I wanted to make sure I was using the best tool.
First, just using my standard camera on my iPhone 6S + here are a few photos that I will be testing with 3 apps that I choose -  PicScanner, Google PhotoScan and Photomyne. I learned a lot about each one - and its pluses and minuses.  These are iPhone apps except for Google Photo Scan but there are similar ones available in the Google Play Store.
As you can see the photos are in decent shape, but the paper scrapbook is in terrible condition.
So the first one I looked at was PicScanner.  It is the one I have used before - but it definitely has some features which are good and some not so good.
One nice feature is that it won't take a photo until you get a nicely squared photo, i.e. not too much distortion as your taking the photos.  It takes a few seconds to get the image in focus but it can give you a balanced image. One drawback of PicScanner is that it wants to "crop" your image for you - and sometimes the crops are really weird! There is a way to save the full size image, however saving the image without automatic cropping takes several steps.  They could definitely improve that function.
But one super nice feature is the options for saving and sharing. You can even share directly to Facebook. The latest version also allows for automatic iCloud storage which older versions did not.

Next I tried the Google Photo Scan app.  It was very easy to start to use the app - there is a quick tutorial to get started. It uses a unique tool to reduce the glare on scanned photos.  You center the phone over the image and then move to each of the four corners (the white circles). Then the google app overlays the 4 images to remove the glare.

This is how the final version looks on your phone.  Not too many options here - basic cropping and two saving options - Camera Roll or Google Photos.  Again there is some automatic cropping that occurs in the app, but the results are good.

Finally, I tried Photomyne.  I don't know about you but I have seen this one advertised "everywhere"! The advantage of this app is that it allows for quick photo taking and scanning. There is a Pro version available which allows for unlimited cloud storage of your scans.


I took these with just a few clicks - no need to adjust the alignment or to take multiple images of the same photos. In fact I took these 5 in less time that it took me to do the 1 example above. The app does also do some automatic cropping and color adjustments without the ability to reduce or eliminate those changes (at least in the free version...).
I was fairly happy with the results of all three trials. Each app does a good job of scanning with their own pluses and minuses for cropping and storage.I hope that you take my results and pick the best option for you. As I said, I am blessed to have lots of family photos - the ones I used for my test are from my Aunt's 14th birthday (my mother in the center dancing is only 12 years old, and these photos were taken in Cuba). Whatever app you chose, or if you continue to use a flatbed scanner,  find any and all treasured photos that you are lucky enough to have  and make sure that you do take the time to scan them so that they can be enjoyed by future generations.
Happy scrapping! 


Thursday, February 16, 2017

Off-Theme Scrapbook Layouts

What is an Off-Theme Scrapbook Layout? Well, let me start by saying there are many "everyday" type scrapbooking kits that can fit most typical Project Life pages, or everyday life type layouts. Then, there are themed kits. I'm talking about birthday, holiday, baby, Valentine's Day, etc. So, an "Off-Theme" layout could be a page you create with a kit that is themed for something else. For instance, a baby kit for a ballet class page (those soft pinks could be perfect!).  

www.amberlabau.com


OUTER SPACE THEME to GRADUATION LAYOUT!
Let's take a look at some examples, because I love seeing examples! This first one is by Stacia Hall. She used Outer Limits cards and elements (which is a great star gazer kit) to document a graduation. "Never Stop Exploring" is perfect for this page!

www.amberlabau.com

BABY THEME to GEM OF A HUSBAND
Here's an example of a baby kit being repurposed! Lynette used Brave New World to highlight "what a gem" her husband is.

www.amberlabau.com

GRADUATION THEME to HERITAGE LAYOUT
This beautiful heritage page by Luly G. uses a graduation kit, Life's Journey. I love the old world feel of this kit and think it is perfect for using with old family photos.

www.amberlabau.com


FALL THEME to CALIFORNIA MISSIONS
Jan created this layout about the California Missions using some Fall themed papers, Golden. The colors in these fall papers go wonderfully with the architecture of the Missions she photographed.

www.amberlabau.com


BABY THEME to KITTEN'S FIRST SNOW
Here's another off-theme layout using Brave New World. Diana documented a cute little adventure of her kitten getting its first snow experience. Brave New World, indeed!

www.amberlabau.com

BIRTHDAY THEME to POOL DAY
And one last one that I created using the new birthday kit, Cake Smash. What a fun, colorful kit perfect for a summer day at the pool.

I hope this post has inspired you to take a fresh new look at some of your themed kits! I'd love to hear what off-theme pages you have created!

This post was also published over at www.amberlabau.com, here.
Holly Genc

Monday, January 23, 2017

How to Stretch your Digi stash

I shared some ideas on Amber La Bau's blog today  on how to stretch your digital kits

Hi there everyone!
I know that even though we all have a large stash of kits in our digital arsenals - I also know that we all like to use our kits several times for creating to maximize our crafting dollars. There are several ways that we can do this - which is one of the biggest benefits for digi scrapping. In fact, this was one of the primary reasons that I switched to digital scrapbooking back in 2014.  I was a dedicated paper scrapper before then, but the ability to stretch my stash (in a non-space taking type way) was one of the most instant benefits of digital scrapping.
So let's look at a few ways that we can stretch our stash and our digi kit dollars.
  • Use Neutral colored kits to be able to document lots of everyday memories or even bigger stories. Use key elements of your photos or background to pick a primary color - then shop your stash to find a similar predominant color in the kit.
    Stories to Tell kit
    Stories to Tell kit  - neutral colors and elements. Word art can be used for many different kinds of stories.
    Have Coordinates Will Cache - although this is an outdoor kit - there are lots of great neutral papers and elements to use with any kind of photo.
    Have Coordinates Will Cache - although this is an outdoor kit - there are lots of great neutral papers and elements to use with any kind of photo.
  • The Blackbird kit has lots of great neutrals and bold neutral patterns that can be used for many different kinds of stories.
  • Use flexible templates that can be combined and modified.  These templates can be used for patterned papers, photos or even artsy treatments.
    This example reduces the template and then mats with a large border and highlights some of the great patterned paper
    This example reduces the template and then mats with a large border and highlights some of the great patterned paper
    Story Grids Anthology Vol. 2
    Story Grids Anthology Vol. 2

  • Use "themed" kits off theme.  Not every kit needs to be used for the theme that it was initially designed for.  For example, I used this Christmas/Winter kit, A Season to Remember to document some travel photos from our trip to Spain.
    Use a Season to Remember to document some vacation photos.
    Use a Season to Remember to document some vacation photos.
    A Season to Remember
    A Season to Remember
    I hope this gives you some ideas on how to use your kits again and extend your stash even further.  Have fun documenting your memories!                                        

Thursday, January 19, 2017

Birthday Calendar Reference Cards

Amber LaBau Calendar Cards - Holly w/ www.paintedladiesjournal.com

Do you like to use calendar cards in your Project Life Scrapbooks? I decided to incorporate them this year. I always liked the look, but don't always have photos every week, and sometimes I have tons of photos in one week. I'm just all over the place, so I never really included calendar cards. However, I decided to just flow with it this year. I'll put them in when it makes sense! Now that I have the cards for 2017, I thought I could use the 4x6 version that Amber LaBau designed to create a printed reference set that has all the birthdays of people in my life (are you also a card maker?). I will keep this for years, not just 2017. 
Amber LaBau Calendar Cards - Holly w/ www.paintedladiesjournal.com

First, I did some work in Photoshop Elements. I used a pack of "Labely Bits" from Amber LaBau's shop at the Lilypad to add some pops of color to these cards. One thing of note, the calendar cards are in grayscale. You need to change them to color mode (RGB) before adding color. I also recommend picking a scale for the elements you are adding and actually scaling them down on each card, so they are all the same size. You can place them all and then select all at once to scale. (From menu bar: Image>Resize>Scale) Those nice big labels came in a tad too large for the scale of the card. I scaled everything by 50%.

Amber LaBau Calendar Cards - Holly w/ www.paintedladiesjournal.com
Do you like to send snail mail to family & friends on their birthday? I want to do that more. I thought having this handy (note to self: put it in the pocket of my planner) would help remind me. I used Canon Matte Photo paper. One thing I learned about this paper is that it has two different sides. One side is bright white and the other is cream. Make sure you put your paper in your printer correctly!

Happy New Year!

Holly Genc