Showing posts with label take10kits. Show all posts

Monday, March 7, 2016

Daddy-Daughter Dance and Photo Fixes

I had a special night to document from last February of my husband and daughter going to their first Daddy-Daughter Valentine Dance. So sweet. And I think this layout turned out pretty sweet, too.

This was such a sweet moment to document, but the nighttime lighting in our home and my iPhone camera just didn't produce the best photos. What do you do when that happens? Settle for lousy pics and decide it doesn't matter because it's the memory that matters? This is true, but I really wanted better photos. A few edits and I was much happier.

The pictures were a little fuzzy, too. I did a combination of Photoshop Elements edits and PicTapGo (from my phone). If you use PicTapGo, my favorite combination is the "lights on" and "auto color", which helps 95% of the time. I also brought this one into PSE and applied a "Auto Smart Fix". I played around with "Reduce Noise" to fix a little of the blur, but too much can make it grainy.

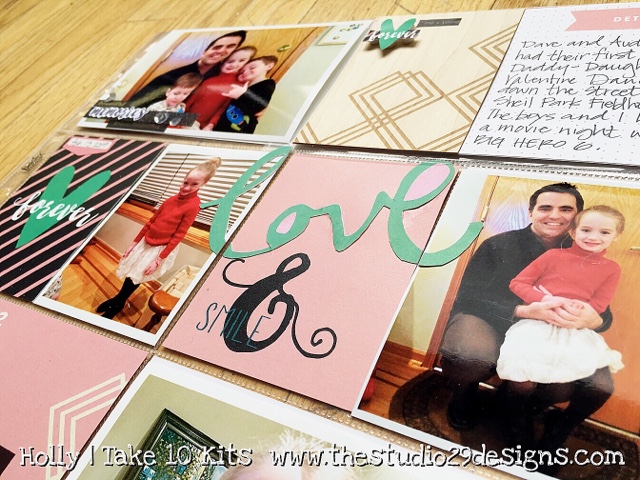
I really loved the striped card with the teal green heart and wanted to pick up that green elsewhere in my layout. I took that card and started comparing it to papers and embellishments in my stash. I came across the word "love" on a PinkFresh Studio paper from my stash, and it was like I could hear angels singing. Yes, I fussy cut that big word out so that I could use it to fill that space on the pink journal card. I really like how it stretches across several cards and highly recommend trying this! I glued it to the middle card first, trimmed the sides and then lined them all up to adhere the side pieces.
I want to give you a closer look at what I did with that 3x4 wood card. First I grabbed a somewhat plain card from my stash of MAMBI cards that picked up the same pink. Then, I added the wood card to the left half. I like the idea of including that matching tag, but I decided to cut out the heart, so it wasn't too similar to the card. And, do you know what else I did? I trimmed off the beveled end to use as a tab! Perfect!
This is actually a 4x6 flip page. I had a cute picture of me and my two boys' "night in" that I wanted to include, but not necessarily take center stage on the layout. Again, not a great picture. In this case, I chose to make it black and white. That is another trick that I like to use. A not so great photo will usually look better as black and white. I tried fixing the color, but still didn't like it so much...b&w for the win.

There's the hidden picture with a internet image to represent the move we watched.

I sprinkled some silver and clear sequins from the kit on the top left photo and again on the bottom right photo. That pink tab highlighting the date is from my stash (Simple Stories Life Documented).

Bottom Right Photo detail. I'm gonna tell you something. I used my Scotch Quick-Dry adhesive (photo-safe) and it's great for little items. Somehow, I made a mess of this photo gluing these sequins on. I mean, it looked like a preschooler got glue-happy. I set it aside and hoped it would dry clean. Amazing! I did nothing to fix it and it looks just fine! 
Bottom Left card. I used the PicStitch app to make this smaller photo. I used the extra stamp set that is available in the shop, here, to make the "happy" word. This stamp set is very versatile for Project Life pages.


Below are a few affiliate links to help you find some products that I used.
Of coarse the kits themselves are linked at the top of the post (the shop link).

Pink Paislee - C'est La Vie Collection - Washi Sheets with Foil Accents Pink Paislee - C'est La Vie Collection - Transparent Stickers with Foil Accents - Word Jumble
Doodlebug Design - Sequins - Rainbow Pack

Scotch Quick-Dry Adhesive (great for small/skinny items)


Glossy Accents is another great product to use for adhering small items. It is also fun to use on top of products to add a little gloss to a die cut or stamped image, for example.

Ranger Ink - Glossy Accents - Clear Dimensional Embellishment - 2 ounces

Tombow are my favorite tape runners
Tombow - Mono Adhesive Dots Roller - Permanent - Refillable
Tonic Spring-Cut Detail Scissors. These are great and they are purple! I have two pairs.


VersaMagic Chalk Ink (it stamps much lighter than this)


My Go To Black Ink

Staz On Ink Pads - Jet Black
My Miny Attacher is used almost always. Love it.
Advantus - Tim Holtz - Idea-ology - Tiny Attacher with 100 Tiny Staples
Sharpie Pens are archival safe. This set is great for journaling and planners.


My home printer and favorite 4x6 photo paper:

Monday, February 29, 2016

Kit Subscriber Tips & February "Darling" Kit

Hi, there! Holly, here, from Painted Ladies Journal with my first February "Darling" Kit layout to share with you. And they are still in the shop.

If you are a kit subscriber, I have a few tips to share that work for me. 
TIP 1: When I get my new kit, I look through the cards and "loosely" group together the cards I want to use for each layout I will do. I think this helps to make sure I use them all. So, for my first February kit layout you can see I picked those watercolor cards and then coordinated colors with the other card selections.


Those stamps this month are just fabulous. Did you pick up the extra one? I love the brush font and versatile everyday sentiments. Get it here

TIP 2: It is great to use up that kit now vs. picking and choosing from all your kits you may have hoarded. Kits are designed for the current months, but you can use them for that month from last year, if you work like me. So, all those "left overs" from past kits should now be divided up into your regular supply organization. You will more likely see it and use it.

I adore that sprinkle of sequins. I started with 4-5 and couldn't stop added them. I like to use a fine point glue applicator, like Scotch makes or Glossy Accents to adhere them.


TIP 3: Get out your stamping tools and a some white cardstock. I tend to stamp on cardstock and cut it out so that I don't mess up my one-of-a-kind kit cards. Unless you are going for a messy look...which is fun, too. Regardless, the point is, stamp a bunch of stuff now with your supplies out and you can use them with all your layouts using this kit.

I had a lot of filler cards in this layout. I like to add dimension to break it up a bit and give it more interest. I added the wood veneer tag with a few pop dots to that "plus" pattern card. I had some chevron wood veneers and letters to highlight that purple patterned card.
See the label on that top photo? I did exactly what I say I don't typically do, and stamped on the cut-apart! Rebel. The alpha stamp in this kit is very cute and designed to easily line up the letters so you can space them nicely and keep them in a straight line. They are great! 

To summarize my subscriber tips:
1. Group cards together for each layout (but not set in stone)
2. Keep using your kit now (don't hoard them). 
3. Stamp a bunch of items at the same time on cardstock to use for all your kit layouts.

Go out and "kill those kits"!

Thank you!
(Hop over to my blog post for an extra supply list)
Follow me on Instagram

Below are a few affiliate links to help you find some products that I used.
Of coarse the kits themselves are linked at the top of the post (the shop link).


Scotch Quick-Dry Adhesive (great for small/skinny items)


Glossy Accents is another great product to use for adhering small items. It is also fun to use on top of products to add a little gloss to a die cut or stamped image, for example.

Ranger Ink - Glossy Accents - Clear Dimensional Embellishment - 2 ounces

Tombow are my favorite tape runners
Tombow - Mono Adhesive Dots Roller - Permanent - Refillable
Tonic Spring-Cut Detail Scissors. These are great and they are purple! I have two pairs.


Alphabet and Numbers Wood Veneers (I used to spell FUN in my layout)

VersaMagic Chalk Ink (it stamps much lighter than this)


My Go To Black Ink

Staz On Ink Pads - Jet Black
My Miny Attacher is used almost always. Love it.
Advantus - Tim Holtz - Idea-ology - Tiny Attacher with 100 Tiny Staples
Sharpie Pens are archival safe. This set is great for journaling and planners.

Here are some Heidi Swapp Acetate Words. I couldn't find the set with the word "Together" that I used, but these are similar and very fun. "Today" is in the same peach color that worked so well with these cards.
Heidi Swapp - Hello Today Collection - Memory Planner - Clear Words
Today's photos were printed by Persnickety Prints (can't recommend them enough, and I'm not an affiliate for them) but I do print a lot at home, too, using this printer and paper